HDR Photography of Japanese Shrines & Temples: Working The Shot & Post-Processing Techniques
Share
It’s very rare that the first photo taken of a subject is the best. Sure, you might get lucky, but getting the best shot usually involves working the scene to pull off the vision in your mind’s eye.
This article gives some insight into how I photograph Japanese shrines using High Dynamic Range (HDR) photography.
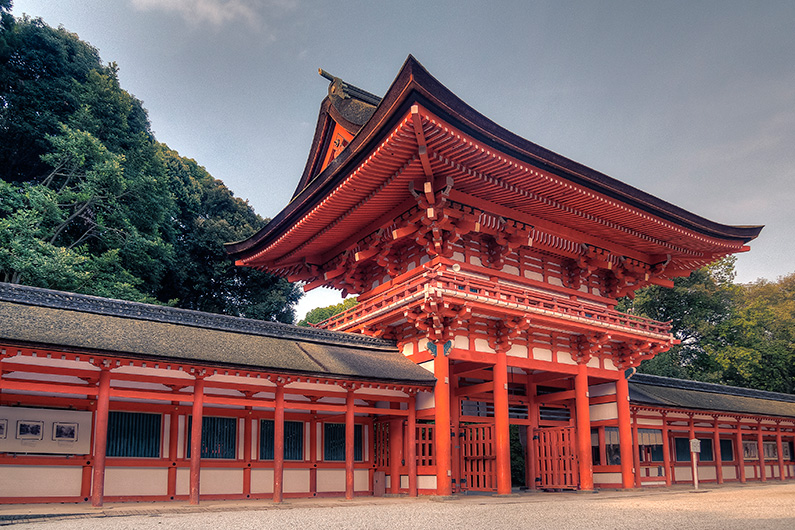
HDR Photo of the Tower gate 「楼門 rōmon」 at Shimogamo Shrine in Kyoto
Panasonic DMC-LX3 (5.09mm, f/2.8, 1/500 sec, ISO80)
Tower Gate at Shimogamo Shrine, a UNESCO World Heritage site in Kyoto
Tips for working the shot
Usually I have an idea in my head as to what I want the photo to look like. Sometimes there’s no vision at all, but I still want to create a nice shot. Here are a few tips you can use, which I follow when photographing Japanese shrines:
- Plan to get the right light: When traveling Japan, I always schedule shrine visits for first thing in the morning or late afternoon. This helps to get good light on the shrine buildings, as you won’t be photographing in harsh midday sun. Shimogamo Shrine opens very early, close to dawn, so it was an easy choice to arrive here at 5:30AM.
- Enjoy the scenery: Don’t go straight in with your camera. Stroll around the site and enjoy it before glueing your eye to the view finder. Get an idea for the layout and features of the shrine. This will help to give you ideas about what to include in frame.
- Experiment with angles, framing, composition and height: Don’t just stand and shoot, try different angles and shooting from up high or down low. Move to the opposite side of the subject. Always check the edges of your photo to make sure it contains only the elements that you want. Instead of zooming, try to move physically closer.
- Take lots of photos: This should go without saying, take as many photos as possible. Don’t go the cheap option and have a single 2GB card for your camera. I always have multiple SD cards of between 8-32GB. The more you shoot, the better your chances of getting the right shot. It took me 34 photos to get one I was happy with.
- Multiple exposures: HDR photos are made of multiple photos, each of the same scene, but taken at different exposures.For example, you could take one photo at +2 exposure, one at -2 exposure and one at 0 exposure. If you or your camera can handle it, try to take more than 3 exposures. My best HDR photo yet, The Torii of Peace at Hakone Shrine, is a combination of 13 exposures - this set of exposures is known as a bracket.
- Lock focus: This is very important, you need to either lock your camera’s focus (on a point and shoot) or switch to manual focus (on a DSLR) to ensure each photo is the same (except of course, for the exposure).
Here are a few of the photos that didn’t make the cut. While there are some pretty good ones there, none were the photo that I had in my head:
Working the shot: notice the different height and framing of the two right photos.
HDR post-processing
I’m a big fan of HDR photography when it’s done right. It allows you to capture the full range of lights, midtones and darks in a photo, so the result can be closer to what you actually see with your eye.
If you’re shooting HDR, make sure you understand the basic principles. There are plenty of great resources, I highly recommend reading Trey Ratcliffe’s words on the subject. Don’t dive straight into HDR thinking you’ll produce awesome photos, it takes time and experimentation.
My workflow for creating HDR photos is:
- The shoot: Take a minimum of 3 photos at ±2EV (one photo at 0 exposure, one at +2 exposure and one at -2 exposure… This isn’t a must-follow rule, but a good number to pick if you don’t know what you’re doing). You’ll learn the settings over time. I generally try to make more than 3 shots, between 5 and 13 photos. Always use a tripod and remote shutter release. This set of photos is known as the “bracket”.
- Importing the photos: Adobe Lightroom is my tool of choice. When importing I always check the meta data info, and tag the photos appropriately.
- Review and minor corrections: Still in Lightroom, I review the photos to choose the best for full processing. Once I’ve chosen a bracket, I’ll make minor corrections (most common are lens corrections and chromatic abberation, less common is white balance).
- Export the photos to Photomatix: I used to use Photoshop for making the HDR photo, but Photomatix does a much better job, especially with ghosting (which occurs when there is movement in the photo). From the export panel in Lightroom, I export 16bit TIFF files straight to Photomatix.
- Enhance the photo in Photomatix: I won’t go into the details here as Photomatix is a very detailed program. Experiment with the settings. Make a few different versions if you can’t decide.
- Bring the photo back to Lightroom: Once I’m happy with the HDR photo from Photomatix, I import the photo back into Lightroom to keep with my library.
- Optimise for web use: 99% of the time I’m creating a photo for the web, to do this I always use Photoshop. When sizing down an image in Photoshop, I recommend using Smart Sharpen, as the image can be blurred.
A few other tower gates I’ve photographed in HDR:
- HDR photo of rōmon at Kamigamo Shrine (the “sister” shrine of Shimogamo Shrine)
- HDR photo of rōmon at Fushimi Inari Taishai in Kyoto
Location of this photo:
View this location - Map coordinates: 35.038526,135.772942.
Read the full travel guide for Shimogamo Shrine.
