Kyōto「京都」
Ginkaku-ji, Kyoto: Travel Guide + Photos
Ginkaku-ji 「Silver Pavilion Temple, 銀閣寺」 - officially called Jishō-ji 「Temple of Shining Mercy, 慈照寺」 - is 1 of 17 UNESCO World Heritage sites in Kyoto and isn’t actually silver.
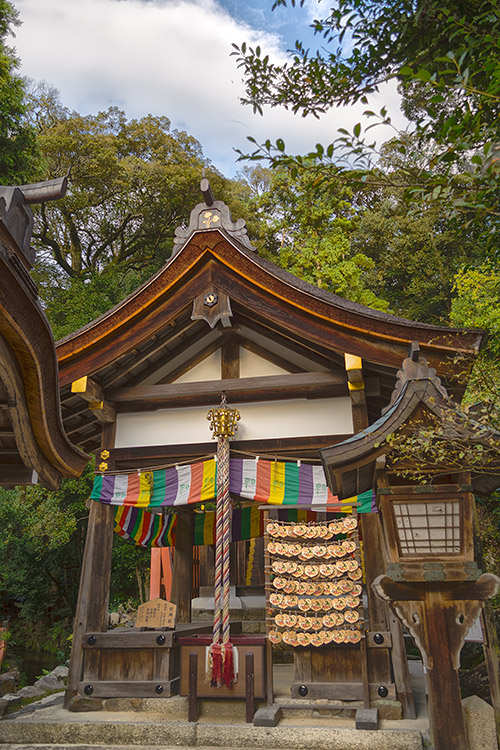
Ginkaku (Silver Pavilion, 銀閣)
In this article:
Quick facts:
- Construction completed around 1482, built as a villa for the Shogun.
- Converted into a Buddhist temple and named Jisho-ji when the Shogun died in 1490.
- Originally the exterior of the Kannon Hall, the storied icon of the temple, was finished in a black lacquer.
- There are two tales of why the temple is commonly called The Silver Pavilion:
- The Shogun who ordered construction of the buildings originally planned to cover the Kannon Hall in silver leaf, similar in style to his grandfather’s Golden Pavilion Temple. However, Ginkaku-ji was never painted silver.
- Lights reflecting off the pond surrounding the Kannon Hall shone like silver on black lacquered exterior walls.
- UNESCO World Heritage status given in 1994 as part of the Historic Monuments of Ancient Kyoto.
- Open 365 days a year.
- Easily accessed by Kyoto city bus, 5 minutes walk from the bus stop.
Explore Ginkaku-ji
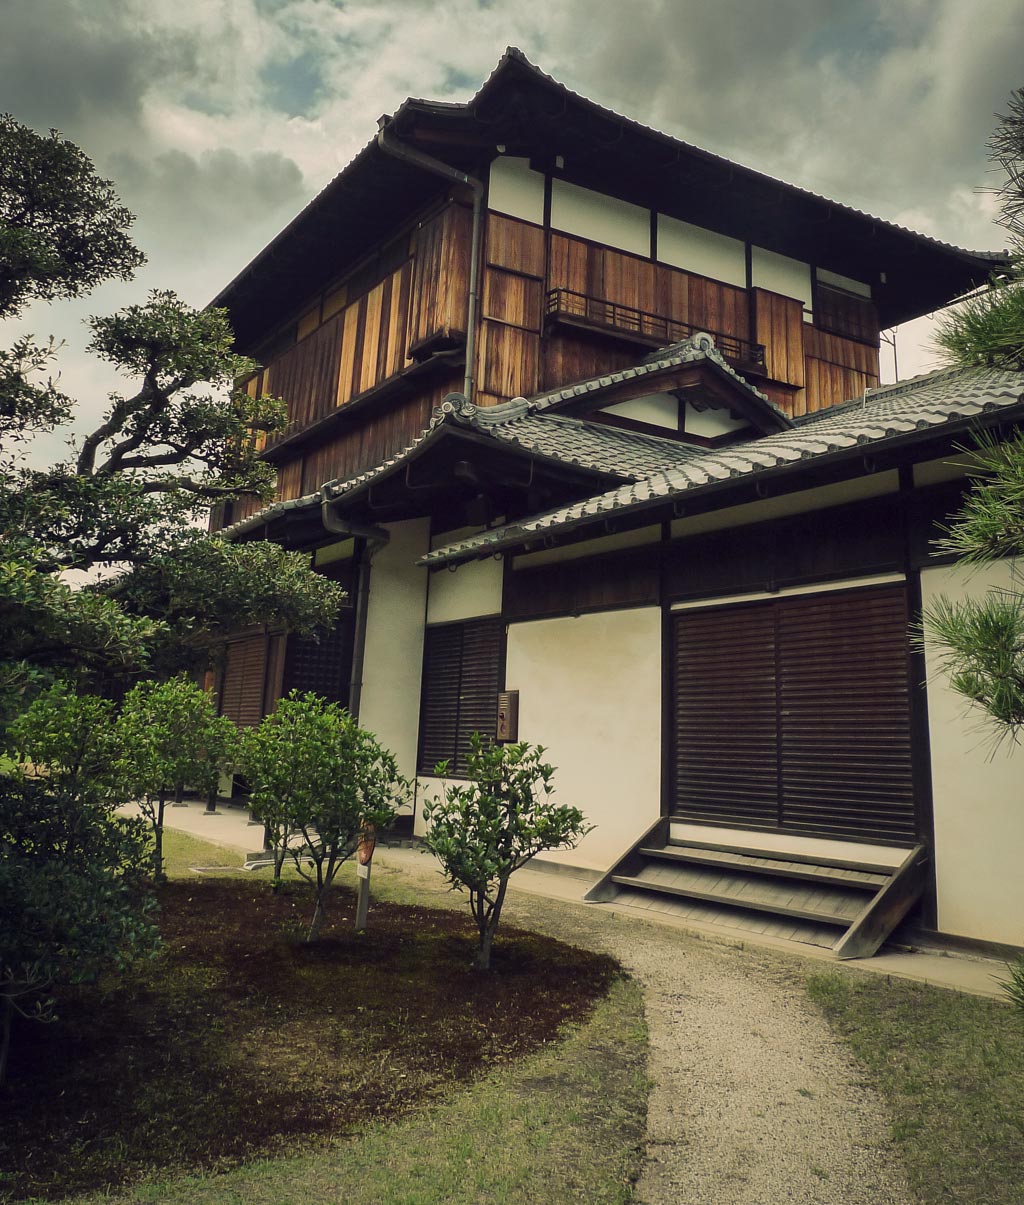
Ginkaku-ji features a handful of buildings. Although comparatively small in size to other famous locations in Kyoto, this temple has a rich history.
Senkei-bashi (Senkei Bridge, 仙桂橋) over the Kinkyochi (Brocade Mirror Pond, 錦鏡池) leading to the tiny Hakkaku-jima (Hakkaku Island, 白鶴島)
Ginshadan (Sea of Silver Sand, 銀沙灘), and Kōgetsudai (Moon-Viewing Platform, 向月台), said to represent Mount Fuji
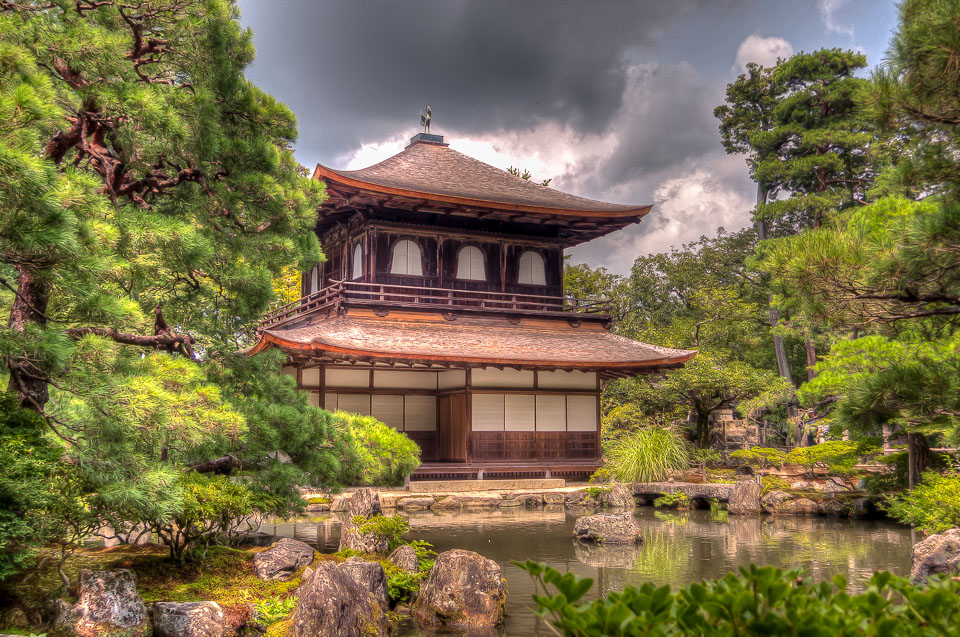
The Silver Pavilion
Ginkaku (Silver Pavilion, 銀閣) built in 1489.

Silver phoenix on the roof of the pavilion.
Map of Ginkaku-ji
Map of Ginkakuji (Jisho-ji)
How to get to Ginkaku-ji
If not traveling by a hire bike in Kyoto, Ginkaku-ji is easily accessed by bus.
- From Kyoto Station: take Kyoto City Bus number 5 or 17.
- From Kinkaku-ji (Golden Pavilion Temple): take Kyoto city bus 102 or 204.
Opening hours and admission cost
The temple is open:
- 8:30AM - 5PM, 1 March - 30 November
- 9AM - 4:30PM, 1 December - end of February
Entry to the temple costs:
- Adults/high school students: ¥500
- Childeren and juniour high school students: ¥300
Traveler’s tips
- Ginkaku-ji is quite small, so you don’t need long to see the entire complex. Unless you plan to sit and contemplate the while looking at the zen rock gardens, you’ll spend no more than 1 hour here.
- Hire a bicycle in Kyoto and ride to Ginkaku-ji. Most of the city is very flat and makes for a more interesting journey.
Other things to do near Ginkaku-ji
Ginkaku-ji is on the same bus routes as several other interesting landmarks:
- Bus route 100: Sanjusangen-do Hall, Gion, Yasaku-jinja Shrine and Kiyomizu-dera Temple
- Bus route 203: Kinkaku-ji Temple
- Bus route 204: Shimogamo Shrine, Nijo Castle and Kyoto Imperial Palace (also bus 102 and 203 for the Palace
Nijo Castle, Kyoto: Travel Guide + Photos
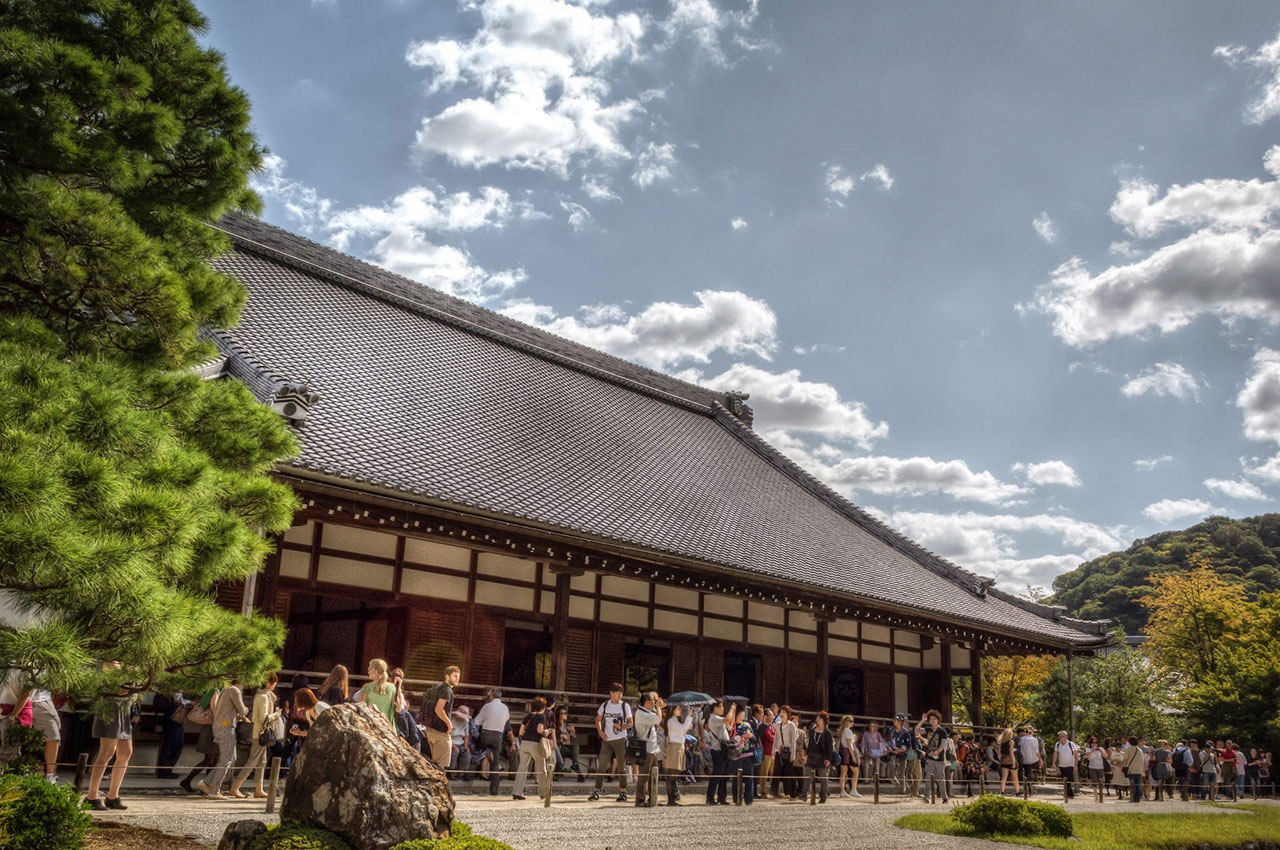
All of the historical facts in this article are taken from the World Cultural Heritage Sites Historic Monuments of Ancient Kyoto inscription located at the entrance of Nijo Castle.

Nijo Castle in Kyoto… not your stereotypical Japanese castle.
Kyoto’s Castle - Nijo Jo
Nijo Castle was built in 1603 by the infamous Tokugawa shogunate. The castle defended the nearby Kyoto Imperial Palace and was a place for shoguns to stay when they visited Kyoto. Almost 400 years later, in 1994, it officially became a UNESCO World Heritage Site.
In 1626 the castle underwent a huge renovation and there are still remains in the castle grounds from that time.

Check me out in the reflection! Very hot and humid day.
This guard station was original built in 1663.
A group of samurai known as the Nijo Zaiban were dispatched by the shogunate for night watch and patrol around the castle. One group comprised 50 samurai and the castle had two groups permanently stationed at Nijo Castle.
Every spring (April) the guards would rotate duty with other squads.

The main gate with the guard station (previous picture) on the left.
This gate pictured above is called Ninomaru Higashi-otemon (higashi = east and mon = gate) and it is the main entrance to the Nijo Castle grounds.

Ninomaru-goten Karamon.

Such detail and colour, welcoming the special people into the inner grounds of Nijo Castle.
Ninomaru Palace and Garden
The real history and main reason this is a World Heritage site is seen at the palace and landscaped garden inside the castle walls.

Ninomaru Goten - you could roughly translate goten in Japanese to a mansion in English.
The Ninomaru Palace inside the castle grounds is made up of many residential style buildings in a diagonal pattern alongside a pond. Each room inside the palace has its own individual and magnificent features.

Ninomaru Teien.
To the south west of the palace is Ninomaru Teien (teien = a special type of wide, landscaped, designed garden). It has designed rock formations, a man-made waterfall and three small islands in the pond.

Another view of the Ninomaru Teien.
Honmaru Palace - Inner-Inner Nijo Castle Grounds
Over a bridge crossing a moat, and through another gate is area of raised ground deep in the center of the Nijo Castle grounds.

A view of Honmaru Palace from a raised ground area deep inside Nijo Castle.

One of the residential style buildings of the Honmaru Palace that has Japanese Important Cultural status.

Close-up of another palace building

Another of the Palace buildings.
.")
The interior moat and Honmaru Yoguramon (gate). This moat separates the Ninomaru area from the Honmaru area.

This place has World Heritage status… respect!
Visiting Nijo-jo
[bgmp-map placemark=”6900″ zoom=”12″]
Nijo Castle is really easy to get to, it’s very close to Kyoto station. You can take the bus (a 500 yen day bus is the most economical way to get around Kyoto) which is only a 15 minute ride from Kyoto station. Alternatively you can take the subway to the Nijo stop.
Entry is 600 yen.
When I last visited Nijo Castle I was using a day hire bicycle, such a great way to get around Kyoto!
Travel tip
Nijo Castle is on the same train line as another Kyoto World Heritage site, Daigo-ji Temple. Spend the morning at the castle and then the afternoon at the temple!
Daigo-ji, Kyoto: Travel Guide + Photos
Daigo-ji is a hidden gem in the 17 UNESCO World Heritage Sites in Kyoto. The temple complex is in the same ward as the impressive Fushimi Inari Taisha. It’s just far enough out of Kyoto that the throngs of usual tourists aren’t typically found here.
In this article:
Daigo-ji 「Daigo Temple, 醍醐寺」 is named after Mt Kami-daigo where the first structures of the temple were built in the late 800’s. The entire temple complex is quite large and you could easily spend a whole day here.
Daigo-ji consists of 3 parts:
- Kami-Daigo (upper mountain area)
- Shimo-Daigo (lower part)
- Sanbō-in (garden area)
Unfortunately I didn’t have a whole day to see all of the temple complex. This article shows the buildings and grounds found in the Shimo-Daigo 「下醍醐」 area which contain the iconic Benten-dō Hall and ancient five storied pagoda (which has been standing for over 1000 years).
Explore the Shimo-Daigo area of Daigo-ji
Niō-mon 「Nio Gate, 仁王門」
This gate marks the entrance to the Shimo-Daigo area. The Nio-mon gate here at Daigo-ji is of the zuishi-mon「随身門」 style of tower gates, just like the zuishi-mon tower gate at Kanda Shrine in Akihabara, Tokyo.
Niō 「Fierce “Benevolent Guardian Spirits”, 仁王」

Nio statue inside the Nio-mon gate (left side)
Either side of the central walkway through the Nio-mon gate are huge Nio statues. These are fierce protective spirits guarding the entrance to this area of the temple. These two statues were built in 1134, escaping multiple fires at the temple.

Nio statue inside the Nio-mon gate (right side)
Kon-dō 「Golden Hall, 金堂」
The Kon-dō at Daigo-ji is the main hall for the temple. Just like many other historic temples across Japan, Daigo-ji is actively used by Buddhist monks, many living on or around the temple grounds. If you’re lucky, you’ll spot them walking in order lines to and from buildings, or hear them chanting sutras within the halls.
Although Daigo-ji has, in some form or another, had a main hall for many centuries, this particular structure was built in 1600. It was relocated here all the way from Wakayama Prefecture, about 100km to the south.
Fudo-dō 「Fudō-Myō-o Guardian Deity Hall, 不動堂」
Beside the large Golden Hall is the smaller Fudo-dō. This hall is dedicated to the Fudō-Myō-o Guardian Deity. Inside the hall are 5 statues, with the Fudō-Myō-o being the largest of the 5 and taking the most central place. This deity is also shown on a large stone in the hall’s courtyard.
Daiko-dō 「Large Lecture Hall, 大講堂」
The Daiko-dō was built in 1930 on the 1000th anniversary of Emperor Daigo’s death. Although the temple was not named after Emperor Daigo, he was alive in the early years of the temple’s formation and ordered many buildings to be constructed.
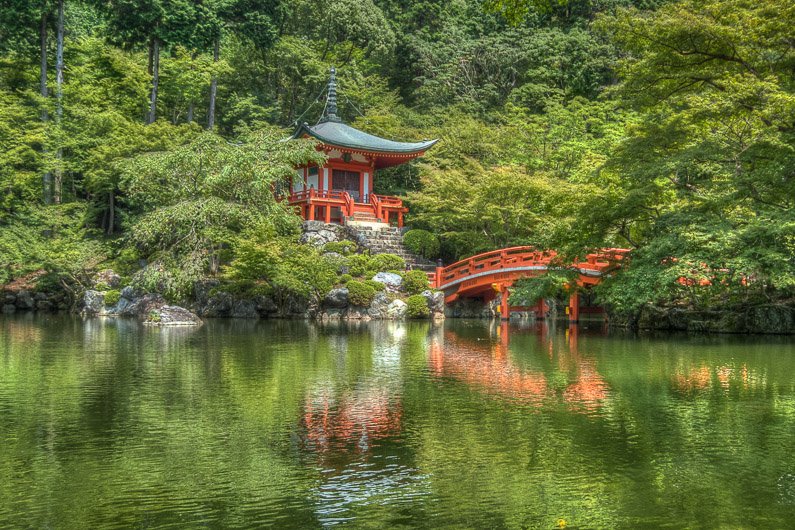
Benten-dō 「Benzaiten Goddess Hall, 弁天堂」
An icon on Daigo-ji: The Benten-dō (HDR Photo)
The Benten-dō is one of the key icons of Daigo-ji. It is one of the most photographed structures here, and looks stunning at any time of year. The small vermillion coloured Benten-dō hall is dedicated to Benzaiten, a Buddhist goddess.
Gojū-no-to 「Five Storied Pagoda, 五重塔」
The gojū-no-to 「five storied pagoda, 五重塔」 at Daigo-ji is the building which inspired me to visit. It is an ancient architectural masterpiece and stands 38m tall. Inside the lower levels of the pagoda are various Buddhist paintings, ancient artworks telling an important history of Buddhism. These paintings have been dated back to the 1100s.
Daigo-ji’s Five Storied Pagoda is the oldest building in Kyoto

The five storied pagoda, topped with a “sorin” spire (HDR Photo)
This is my favourite building in the temple complex, and I was in total awe being in its presence. The pagoda is well over 1000 years old and has escaped fire damage and survived many earthquakes over the centuries. The unique design of the pagoda gives it flexibility in an earthquake, with its various levels suspended around a central column.
Daigo-ji’s Five Storied Pagoda has stood since 951

One word: impressive (HDR Photo)
There are more buildings in the Shimo-Daigo section of the temple complex than what I’ve photographed. There are two other entirce sections of the complex to explore…
I’ll definitely be returning!
Macha Zaru Soba Set
「Green Tea Cold Soba Noodle Set, 抹茶ざるそば」
My visit to Daigo-ji happened in the middle of a hot and sweaty summer in Japan. Just outside the temple walls, next to the temple’s car park, is a small restaurant. I was delighted to find they served cold green tea soba noodles. These are soba noodles with green tea flavour that are served on ice. A dipping sauce and various condiments came with the the set… おいしい! Delicious!
How to get to Daigo-ji Temple, Kyoto
By local train then bus:
From Kyoto Station, take the JR Kosei Line to Yamashina Station, a 5 minute trip of ¥190 (or free using a JR Pass). At Yamashina Station change to the Kyoto City Subway Tozai Line and go to Daigo Station, a 9 minute trip of ¥260.
From Daigo Station, you can walk to the temple - but I highly recommend the bus. There is a local bus which departs from outside Daigo Station, it leaves every 20 minutes and costs ¥200. Just look for the signs when you exit the station, there are signs in English.
[bgmp-map placemark=”6891″ zoom=”12″]
Opening hours and admission cost
For the Shimo-Daigo (or Garan) area, the opening hours are:
- 9am to 5pm: March through to the 1st Sunday in December
- 9am to 4pm: From the day after the 1st Sunday in December through to the end of February
Entry for adults is ¥600.
More information about other ticket prices and hours for other areas is available from the official Daigo-ji Opening Hours and Fees page.
When to visit Daigo-ji
Just like anywhere else in Japan, the prime times to go are in spring when the cherry blossoms are in full bloom, or in autumn when the ginkgo leaves turn deep red and gold. If you’re lucky, the temple would also look amazing during snowfall, which does happen in Kyoto.
For events at Daigo-ji, visit the official Daigo-ji events page.
Traveler’s tips
Allow plenty of time to visit the 3 different areas - I recommend allowing the entire day. The photos above are from just one area, and I spent about 3 hours in just this one section.
Also, consider having lunch there, delicious!
Other things to do in Kyoto
Since Daigo Station is on the same line as Nijo-jo-mae Station, you could see both Daigo-ji and Nijo Castle in the same day.
You could take my approach, and try to visit each one of the 17 World Heritage Shrines, Temples (and one castle) in Kyoto.
Kamigamo Shrine, Kyoto: Travel Guide (Info + 20 Photos)
Kamigamo Shrine lays claim to the oldest shrine in Kyoto. This UNESCO World Heritage shrine in Kyoto is a hidden gem in the treasure of the ancient city’s historic sites.
In this article:
Kamigamo Shrine 「Kamigamo-jinja, 上賀茂神社」 is a UNESCO World Heritage site and is officially called Kamo-wake-ikazuchi-jinja 「賀茂御祖神社」 and together with Shimogamo Shrine「Shimogamo-jinja, 下鴨神社」 form the Shinto shrine complex called Kamo Shrine 「Kamo-jinja, 賀茂神社」.
The kanji used in the colloquial name 「上」 is the character for up and the kanji in Shimogamo-jinja’s name 「下」 is the character for down. These names could be interpreted as upper and lower Kamo shrines.
Both shrines are situated close to the Kamo River 「Kamo-gawa, 鴨川」 and both have small streams leading off the Kamo-gawa into the shrine precincts.
Kamigamo-jinja is a peaceful shrine that is free to enter and is usually empty of the normal tourist crowds.
Explore Kamigamo Shrine
Kamigamo Shrine’s Main Entrance Gate
「Ichi-no-torii, 一ノ鳥居」
Kyoto City Bus #4 arrives outside the main torii gate leading toward the inner shrine. When I arrived a temporary art installation (the golden triangle in the background of the photo above is one of the art pieces) was on display on the lawn between the 1st and 2nd torii gates.
In the photo above you can also see the 2nd torii, at the end of the path in the right side of the photo.
Path from first to second shrine gate
Looking through art: peering through a hole in a temporary art installation towards the second shrine gate.
The path to the 2nd torii is about 150 metres long and the surrounding lawn contains historic buildings, such as the geheiden seen below. All of Kamigamo-jinja is within a preserved historic landscape area and many of the trees, such as the weeping cherry blossom tree on this lawn, are very old.
This route is called the sando, and is meant to be a clear space to be used as a kind of walking meditation in preparation for entering the inner shrine.
The Outdoor Hall of Offerings
「Geheiden, 外幣殿」
The geheiden is one of two historic buildings on this lawn. On the 4th Sunday of every month markets are held around this building, with over 200 stalls selling local handicrafts and produce, sweets, snacks and souvenirs.
Third Shrine Gate
「San-no-torii, 三ノ鳥居」
Behind the geheiden, to the west of this area, is the 3rd shrine gate. Beyond this gate are some old buildings and a tiny sub-shrine.
Ancient Store House
「Azekura, 校倉」
This log store house, azekura, is a few steps beyond the 3rd torii. This building was used for storing precious shrine artifacts and is positioned away from other buildings, to reduce the risk of a fire.
Auxiliary Shrine: Nara Shrine
「Sessha: Nara-jinja, 摂社:奈良社」
The tiny Nara-jinja is a sub-shrine located near the 3rd torii. This shrine is named after the sacred Nara-no-ogawa 「Nara Stream, 奈良の小川」 which runs through this area of Kyoto, including through Shimogamo-jinja.
Admittedly this is a terrible photo, but I’m sure you can make out the shrine!
Beyond the Second Shrine Gate
「Ni-no-torii, 二ノ鳥居」
Passing through the 2nd torii brings you into an area of the shrine where the most important buildings are located. The white gravel of this area is meticulously curated by monks, as it is sacred ground where the deities of the shrine are said to have touched the earth.
Music Hall
「Gaku-noya, 学屋」
Near the 2nd torii is the Gaku-noya. Built in 1628 this hall was used for musical ceremonies.
Decorative Sake Barrels
「Kazaridaru, 飾り樽」
The decorative sake barrels 「kazaridaru, 飾り樽」 are found at many Japanese shrines and are a form of offering to the shrine. This stand of sakedaru is on the opposite side of the 2nd torii to the gaku-noya. Sake is an important element in rituals and ceremonies at Japanese shrines.
Long Narrow Hall
「Hoso-dono, 細殿」
Most Japanese shrines will have a Shinto deity enshrined, the center of all worship at the shrine. Kamigamo-jinja’s deity is Kamo-no-Wake-Ikazuchi-no-Mikoto, 「Young Thunder Prince of Kamo, 賀茂別雷命」 who is said to be the son and grandson of the two deities at Shimogamo-jinja.
The two cones of sand in front of the hoso-dono have spiritual and religious purification powers. The cones are called tatezuna 「立砂」 and represent the sacred Kami-yama 「Mount Kami, 神山」. The shrine is located at the foot of this mountain, and the shrine’s deity is said to have descended from the heavens to reside on this mountain.
Shrine Shop
「Juyosho, 授与所」
Like other Shinto shrine shops, here you can buy:
- Amulets/talismans: 「Ofuda, お札」
- Good luck charms: 「Omamori, お守」
- Prayer boards: 「Ema, 絵馬」
- Good fortune paper slips: 「Omikuji, 御御籤」
- Sacred demon destroying arrows: 「Hamaya, 破魔矢」
The sacred arrow has special importance to Kamigamo-jinja. Myth says that Princess Tamayori was bathing in the Kamo River and found a red arrow floating nearby. She kept the arrow, and through its powers gave birth to the Young Thunder Prince of Kamo, the deity of Kamigamo-jinja.
Auxiliary Shrine: Kataoka Shrine
「Sessha: Kataoka-sha, 摂社:片岡社」
Auxiliary shrine Kataoka-sha at Kamigamo-jinja in Kyoto (HDR Photo)
This small sub-shrine is dedicated to Princess Tamayori, the mother of the Young Thunder Prince of Kamo. Read more about the Kataoka sub-shrine.
Auxiliary Shrine: Suwa Shrine
「Sessha: Suwa-jinja, 摂社:須波神社」
This is another small sub-shrine, located next to the Kataoka-sha sub-shrine.
Tower Gate and Tama Bridge
「Rōmon/tama-bashi, 楼門/玉橋」

Kamigamo-jinja Tower Gate (rōmon) front (HDR Photo)
The rōmon 「Tower gate, 楼門/玉橋」 and Tama-bashi 「Tama Bridge, 玉橋」 are the icons of Kamigamo-jinja. The rōmon stands at the entrance to the shrine’s most sacred grounds, where the main shrine 「Honden, 本殿」 is located.
The gate and bridge are painted in a rich vermillion colour, typical of the features found at many Japanese shrines.
Chainsaw Art
「チェンソーアート」
Every year different chainsaw art sculptures are displayed at the shrine. These sculptures represent the animals of the Japanese zodiac and are offerings to the shrine.
Shrine Offerings
The sakedaru 「decorative sake barrels」 and ofuda 「talisman」 are also shrine offerings, and together with the chainsaw art are located inside the rōmon close to the main shrine.
Gold Hanging Lanterns
「Tsuridōrō, 釣灯籠」
These golden hanging lanterns are hung under the eaves of shrine buildings. The lanterns can be purchased, or basically rented, to be hung at the shrine as a form of prayer. These lanterns are hanging in front of the honden.
Middle Gate and Main Shrine
「Chū-mon/Honden, 中門/本殿」

Chū-mon (middle gate) in front of the Honden (main shrine) (HDR Photo)
The Chū-mon gate is closed and stops public entry into the most sacred area of the shrine, the Honden. Worshipers stand at the Chū-mon and pray to the main shrine. The middle gate is only open once a year, during Japanese New Year celebrations, and is so sacred that photos are not allowed.
At the time of my visit this area was undergoing restoration, which is due to be completed in 2015 and was the only restoration happening at the shrine.
Most of the buildings that stand today were constructed in the 1600s. All the buildings are carefully maintained and often restored, and you can tell just how old they are, moss and small plants are growing on top of the main shrine building.
… one final photo of the tower gate before leaving!
Kamigamo Shrine map & main buildings
The original photo used for this map is from the official Kamigamo-jinja website.
The numbers above correspond to the photos in this article. Clicking on a number on the map above or on a link below will take you to the corresponding photo:
- First Torii Gate「Ichi-no-torii, 一ノ鳥居」
- Outdoor Hall of Offerings「Geheiden, 外幣殿」
- Third Shrine Gate「San-no-torii, 三ノ鳥居」
- Ancient Store House「Azekura, 校倉」
- Auxiliary Shrine: Nara Shrine「Sessha: Nara-jinja, 摂社:奈良社」
- Second Shrine Gate「Ni-no-torii, 二ノ鳥居」
- Music Hall「Gaku-noya, 学屋」
- Decorative Sake Barrels「Sakedaru, 酒樽」
- Long Narrow Hall「Hoso-dono, 細殿」
- Shrine Shop「Juyosho, 授与所」
- Kataoka Auxiliary Shrine and Suwa Auxiliary Shrine
- Tower Gate and Tama Bridge「Rōmon/tama-bashi, 楼門/玉橋」
- Middle Gate and Main Shrine「Chū-mon/Honden, 中門/本殿」
How to get to Kamigamo-jinja
[bgmp-map placemark=”6905″ zoom=”12″]
The easiest way to get to the shrine is by bus.
- Kyoto City Bus #4 is the only bus that runs to the shrine from Kyoto Station.
- Kyoto City Bus #46 goes to the shrine from downtown Kyoto, Gion, Higashiyama, Kyoto Imperial Palace and Nijo Castle.
See how to use Kyoto City Buses for more information, and tips on how to save money on bus travel.
Alternatively you can hire a bicycle to get around Kyoto. Bicycle hire terminals are located near Kinkaku-ji (the Golden Pavilion Temple) and Kyoto Station.
Opening hours and admission cost
Kamigamo-jinja free to enter and is open every day.
Opening hours below, outside of these times the gate at the 2nd torii is closed:
- 8AM to 5PM April to October
- 8:30AM to 5PM November to April
Other things to do in Kyoto
- Visit the sister shrine Shimogamo-jinja
- Visit any number of the 16 other UNESCO World Heritage sites in Kyoto
- Hire a bicycle in Kyoto, and see the city like a local
When to visit Kamigamo-jinja (events & festivals)
- Kurabe-uma-e-Jinji, May 5: The Ritual of the Racehorses originated in the 1200s and is said to be where horse racing in Japan begun.
- Aoi Matsuri, May 15: The Hollyhock Festival is the main festival for this shrine and one of the biggest festivals in all of Kyoto. Dating back to the mid-500s A.D. the Emperor of Japan sends a messenger on his behalf to worship at the shrine as part of the festival.
- Nagoshi-no-harae, June 30: The Summer Purification Ritual is almost 1000 years old.
- Karasu-zumo, September 9: The Crow Sumo Ceremony is a very unique one - shrine officials imitate the voice of crows and children perform sumo.
The above event information is from the festivals section of the official Kamigamo-jinja website.
Market stalls also take place on the 4th Sunday of every month.
Travel Tip: How to Use the Kyoto City Bus & Save Money on Travel
The majority of tourists visiting Kyoto will ride the Kyoto City Bus. Far too often I see these tourist having difficulty using the bus, so these quick tips will make your transit much simpler.
Get a Kyoto City Bus map
Ask for this at Kyoto Station’s information center, or at your hotel reception. This handy map will show you which buses go where and the routes they take. This will help you plan your bus trips in Kyoto.
Line up
Japanese are very orderly and considerate of each other. If there’s a line at the bus stop, join it, if there isn’t one then line up at the bus stop sign.
When your stop is next, press the button on the seat railings to signal that you’d like to get off.
Board via the rear door
The rear door of the bus is for entry and the front door for exiting. When you get on the bus, move away from the rear door to allow others to board.
Listen or look out for your stop
All buses have some form of display, at the front of the bus near the driver, which show the next stop. If you’re traveling to a major temple or shrine, the stop is almost always named after the location.
Pay for the ride
Using the bus within the city is a flat fee per ride: ¥230 for adults and ¥120 for children of 6 to 12 years old.
In the photo above you can see a fare machine to the left of the driver. Upon exiting the bus you pay for your ticket here. Simply place your coins in the plastic coin catcher on top (outlined with a red sticker in the photo above).
If you don’t have exact change, you can exchange ¥1000 notes or ¥500 coins, giving you the right amount of change to pay for your fare. On this bus (which is typical of many Kyoto buses) put your note or coin in the slots in the purple area. Make sure you do this before your stop, so you don’t hold up other people.
Save money on bus travel
If you’ll be making more than 2 trips in the city on the bus in one day, you can buy an all day bus pass: ¥500 for adults and ¥250 for children. This must be purchased before you get on the bus (there are vending machines at Kyoto station, most hotel receptions have them and you can also ask at convenience stores).
[well]Note: the all-day city bus pass is only valid in certain areas. It covers most, but not all, of the popular sites in Kyoto. Check the Bus Navi Kyoto area map (PDF) for details.[/well]
The all day bus pass will save you money and is very convenient. For your first ride, insert the card into slot of the fare machine and for every ride after that, just show the driver the side of the card with the date printed on it.
More information is available at the City of Kyoto’s public transport page.
List of World Heritage Sites in Kyoto
There are 17 individual shrines, temples and one castle on the UNESCO list of world heritage sites in Kyoto. Collectively the sites are known as the Historic Monuments of Ancient Kyoto.
List of World Heritage Sites in Kyoto
- Byōdō-in* 「平等院」
- Daigo-ji 「醍醐寺」
- Enryaku-ji* 「延暦寺」
- Hongan-ji 「本願寺」
- Ginkaku-ji, Silver Pavilion Temple 「銀閣寺」 (Official name: Jishō-ji 慈照寺)
- Kozan-ji* 「高山寺」 (Official name: Toganōsan Kōsan-ji 栂尾山高山寺)
- Kiyomizu-dera 「清水寺」 (Official name: Otowa-san Kiyomizu-dera 音羽山清水寺)
- Nijō-jō, Nijo Castle 「二条城」
- Ninna-ji* 「仁和寺」
- Kinkaku-ji, Golden Pavilion Temple 「金閣寺」 (Official name: Rokuon-ji 鹿苑寺)
- Ryōan-ji 「龍安寺」
- Saihō-ji* 「西芳寺」
- Shimogamo-jinja 「下鴨神社」 (Official name: Kamomioya-jinja 賀茂御祖神社)
- Kamigamo-jinja 「上賀茂神社」 (Official name: Kamowakeikazuchi-jinja 賀茂別雷神社)
- Tenryū-ji 「天龍寺」 (Official name: Tenryū-shiseizen-ji 天龍資聖禅寺)
- Tō-ji 「東寺」(Official name: Kyō-ō-gokoku-ji 教王護国寺)
- Ujigami-jinja* 「宇治上神社」
* Site I haven’t visited yet.
Tenryu-ji

Large abbey 「大方丈 ōhōjō」 at Tenryu-ji, Kyoto
[bgmp-map placemark=”5035″ zoom=”12″]
View this location - Map coordinates: 35.015989, 135.673308.
Shimogamo-jinja/下鴨神社 in Kyoto (Info and 20+ Photos)
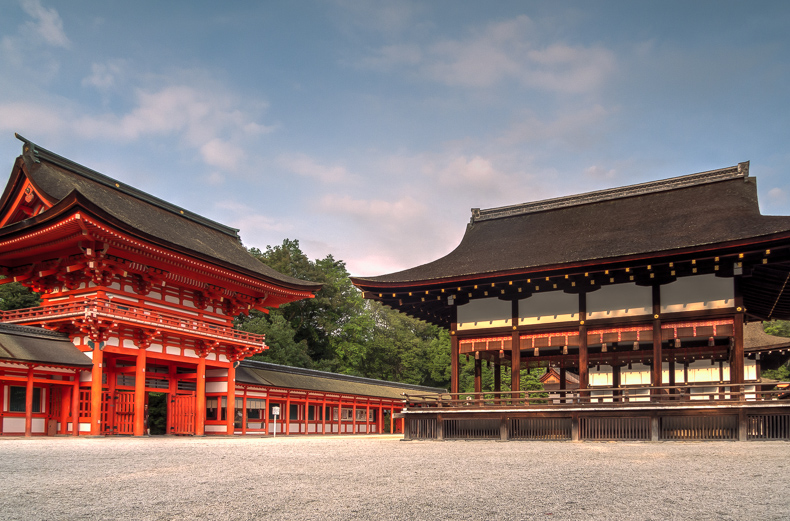
Hidden in the “Forest Where Lies are Revealed”, at a fork in Kyoto‘s Kamo River, just north of the Gion area, is the ancient site of Shimogamo Shrine.
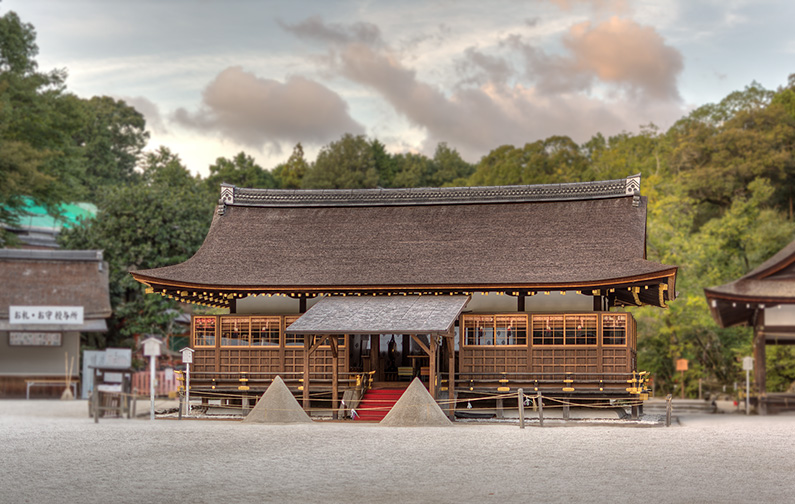
Shimogamo Shrine’s Tower Gate and Sacred Dance Hall
In this article:
This World Heritage site in Kyoto is officially called Kamo-mioya-jinja (賀茂御祖神社), but more commonly called Shimogamo-jinja (下鴨神社), and it doesn’t have the beaten tourist path of more popular tourist hotspots in Kyoto like Kinkaku-ji, Fushimi Inari Taisha, Nijo-jo or the Kyoto Imperial Palace.
Shimogamo Shrine is a “sister” shrine to Kamigamo-jinja.
Shimogamo-jinja is free to enter and is open very early (gates open at 6:30AM), so it’s a great place to start if you want a full day in Kyoto.
This article and all photos are from my visit to the shrine on a very hot summer’s day.
After staying the night at the amazing 9hours capsule hotel near Gion, I left the hotel at 5AM and headed to a convenience store for a few cans of coffee and energy snacks. After a beautiful walk north along the Kamo River, I found myself in a surreal forest…
Explore Shimogamo-jinja (photos & info)
![Shimogamo-jinja's roumon (main gate) in Kyoto [HDR]](../../wp-content/uploads/2013/05/15-Shimogamo-jinja-roumon-kyoto-HDR1.jpg)
Shimogamo-jinja’s Rōmon (楼門 / tower gate) [HDR Photo]
One thing I’ve always loved about Japan is the contrast between old and new. This is a classic example: a torii flanked by vending machines…
Torii and vending machines. Only in Japan, on a street with no name… See it on Google Street View.
The Tadasu-no-mori (糺の森 / Forest of Correction), a sacred and ancient woodland that takes up a large area to the south of the shrine (and surrounds the shrine) was very peaceful when I arrived at about 6AM. Oji-sans and Oba-sans (Japanese for grandfather and grandmother) were doing their morning group calisthenics. Sounds of a stream could be heard in the distance.
In this area is the recreation of an ancient ritual site…
Sign depicting archaeological discoveries.
From the sign:
… Excavations have been carried out in this vicinity since 2001 for the purposes of environmental preservation and, as a result, various ritual remains and the remains of a square ritual altar constructed in the late Heian period (late 12th century) have been unearthed.
‘Stone Paved Site 2’
Many small streams run through the forest area and the shrine complex. Approaching the water ablution pavilion, a stunning small bridge helps you toward the shrine entrance.
An old stone bridge runs over the Nara-no-ogawa (奈良の小川 / Nara Stream) [HDR Photo]
After performing the temizu (te = hand and mizu = water, which is the process of purification at a water basin by the entrance of shrines) you’ll be at the shrine’s main torii. There are many signs on either side of this torii, of most interest is the official UNESCO plaque stating that this is officially one of the World Heritage Cultural Sites - Historic Monuments of Ancient Kyoto.
The key word here is ancient, as relics and sites found in and around the shrine could date as far back as 10,000BC.
Ichi-no-Torii (一ノ鳥居 / First Shrine Gate).
After stepping through the torii gate, you’ll be walking towards Shimogamo-jinja’s rōmon (楼門 / tower gate), an icon of the site. This type of tower gate can be found at other Shinto sites, such as Kiyomizu Temple and Fushimi-Inari Shrine.
The tower gate, as seen from outside the temple.
The gate itself is a Japanese national treasure, as are most of the other buildings in the shrine. After proceeding through the gate, you’re now standing in the shrine grounds.
It’s name suggest something completely different, but although the Shinbuku-den (神服殿 / “Clothing for the Gods” Hall) was once used to sew clothing for the gods, it eventually became a backup temporary residence for the Emperor if the Kyoto Imperial Palace ever caught fire. The hall was actually used as a resting place for the Emperor when he visited. Several visits took place between the late 8th and mid 12 centuries.
Next to the Shinbuku-den is the Mai-dono (舞殿 / Sacred Dance Hall). Over the centuries, Emperors have visited Shimogamo-jinja to pray for the welfare of the entire country. Prayers and gifts from the Emperor would be taken into this hall. Today it is used for dance performances during festivals and ceremonies held throughout the year.
Shinbuku-den/Clothing Hall (left) and Mai-dono/Sacred Dance Hall (right)
It was at about this time, just after passing through the tower gate, that I noticed people sporadically walking between these two buildings toward the inner shrine. Some of them were the elderly people I’d seen earlier, exercising in the forest. It wasn’t until I read about the history of Shimogamo-jinja that I realised that people have been doing this for thousands of years!
Nature, and especially water, are very important elements in the shrine. A few small streams feed off the main Kamo River into the shrine.
Next to the two halls above is the tiny Mitarashi-gawa (御手洗川 / Mitarashi Stream) and the Tama-hashi (玉橋 / Tama Bridge). In July every year, the Mitarashi Matsuri (御手洗の夏祭り / Mitarashi Festival) is held, where a purification ceremony takes place and people walk knee-deep in the stream for ritual cleansing.
Tama-hashi and Mitarashi-gawa.
Romon (left) and Mai-dono (right). I was standing next to the Tama-hashi bridge when taking this photo. [HDR photo]
Following the path of the Oji-sans and Oba-sans who were going to pray at the inner shrine area, I could feel the history of the site. There were no sounds of the city to be heard, only nature. In this part of the shrine you are surrounded by multiple small shrines and impressive gold lanterns, all inside a inner walled section.
Getting closer and closer to the World Heritage buildings, another familiar sight is seen - wooden prayer plaques called ema (絵馬 / small wooden boards with prayers written on them) hang in neat rows next to a small shrine. Here at least 4 Koto-sha (言社 / kotosha “affiliated shrine”) are located, dedicated to Okuninushi-no-mikoto, the god of national affairs. There are 7 shrines in total dedicated to this deity in the shrine complex.
Koto-sha (言社 / a small sub-shrine) and ema (絵馬 / small wooden boards with prayers written on them).
While looking at the kotasha, movement behind the walls deeper in the shrine caught my eye. A monk was ceremoniously walking toward the main halls. He sat down and performed some prayers and rituals, and offered food and drink to the deity enshrined here.
The monk was facing the two main halls: the Nishi-Honden (西本殿 / Western Sanctuary) and the Higashi-Honden (東本殿 / Eastern Sanctuary). These two halls are the World Heritage buildings of Shimogamo-jinja, all other buildings are National Treasures of Japan.
This is the Honden (本殿 / Main Hall), the priest is facing the World Heritage buildings deep inside the shrine.
The east sanctuary is dedicated to Tamayorihime-no-mikoto, the deity of good family lines and child rearing and the mother of the deity enshrined at Kamigamo Shrine. The west sanctuary is dedicated to Kamotaketsunumi-no-mikoto, the guardian deity of good fortune who helped the Emperor Jinmu.
Quote source: Shimogamo Shrine Close Up - Main Hall and Koto-sha.
Closeup of the Honden.
Either side of the hallway in front of the monk (in the picture above) are the Western and Eastern Sanctuaries. Standing guard at these buildings are two koma-inu (狛犬 / lion-dog statue). The sanctuaries are somewhat hidden, so I had to take a couple of shots to (badly) fake a photo of one of the halls (see below).
Two koma-inu (狛犬 / lion-dog statue)
In the center of this inner shrine area, in front of the main hall and beside the koto-sha is the Kawai-jinja Mai-dono (河合神社舞殿 / Kawai Shrine Sacred Dance Hall). This shrine is adorned with glittering gold “sponsored” lanterns and plays an important role in an ancient ceremony that is still held to this today.
Kawai-jinja Mai-dono (河合神社舞殿 / Kawai Shrine Sacred Dance Hall)
The (Kawai-jinja) shrine is dedicated to Tamayorihime-no-mikoto (the goddess associated with Emperor Jinmu thought to promote good child rearing) who is believed by many to be a guardian deity for women.
Quote source: Shimogamo Shrine Close Up - Kawai Shrine.
“Your dedication hanging lanterns”
These gold hanging lanterns are called tsuri-dōrō (つり灯籠 or 釣灯籠 / sponsored hanging lantern). The sign says “your dedication hanging lanterns” (ご奉納 つり灯籠について / gohōnō tsuri-tōrō ni tsuite).
- 1 small lantern is 300,000円 (about $3,000)
- 1 large lantern is 500,000円 (about $5,000)
The lanterns are hung at the shrine, dedicated to prayers for your family and their safety.
Tsuri-tōrō
It was time to start moving again (although it was early, I still planned to see Ginkaku-ji and Daigo-ji today). Exiting the Kawai Shrine area, you pass through the Naka-mon (中門 / Middle Gate).
Naka-mon (中門 / Middle Gate)
Beside the Tama-hashi Bridge is the Hashi-dono (橋殿 / Bridge Hall). This hall sits on top of the Mitarashi-gawa stream, hence it is literally a bridge-hall over this small stream.
Hashi-dono (橋殿 / Bridge Hall) beside the Tama-hashi Bridge.
At the end of the Mitarashi-gawa stream is the Mitarashi-sha (御手洗社 / Mitarashi Shrine) which is formally known as Inoue-sha (井上社 / The Shrine Over The Well).
Mitarashi-sha (御手洗社 / Mitarashi Shrine)
Rows of komo-daru (菰樽 / decorative sake barrels) represent the use of sake in Shinto ceremonies. The original word for sake is miki (神酒), the kanji literally means god wine. Barrels are given to shrines by brewers, symbolising the tradition of the brew’s use at ceremonies and festivals. Meiji-jinju in Shibuya, Tokyo is another shrine where you can find large displays of the barrels.
Rows of komo-daru (菰樽 / decorative sake barrels).
Quick fact: although westerners use the term sake when referring to Japanese rice-wine, in Japanese sake is actually the word for alcohol. The rice-wine we call sake is actually called nihon-shu (日本酒) literally meaning “Japanese alcohol”.
One more photo of the rōmon (楼門 / tower gate)
Shrine map & main buildings
- Rōmon (楼門 / tower gate)
- Mai-dono (舞殿 / Sacred Dance Hall)
- Shinbuku-den (神服殿 / “Clothing for the Gods” Hall)
- Hashi-dono (橋殿 / Bridge Hall)
- Tama-hashi (玉橋 / Tama Bridge)
- Mitarashi-sha (御手洗社 / Mitarashi Shrine) formally known as Inoue-sha (井上社 / The Shrine Over The Well)
- Koto-sha (言社 / koto-sha “affiliated shrine”)
- Naka-mon (中門 / Middle Gate)
- Kawai-jinja Mai-dono (河合神社舞殿 / Kawai Shrine Sacred Dance Hall)
- Honden (本殿 / Main Hall)
How to get to Shimogamo-jinja
Bus from JR Kyoto Station:
Take bus 4 or 205 from the front (north side) of Kyoto Station (called Kyotoeki-mae / 京都駅前) to Shimogamojinja-mae (下鴨神社前). Buy an all day 500円 bus pass, it’s the best way to travel Kyoto. A one-way trip is 220円 for an adult, so it ends up being good value (and very convenient!)
Train from JR Kyoto Station to Demachiyanagi Station:
Note that this route requires the least walking however I advised against this, there are too many transfers… 1. Take the JR Nara Line Local from JR Kyoto Station to Tofukuji Station. 2. At Tofukuji Station, transfer to the Keihan Main Line Sub-Express and go to Sanjo Station. 3. At Sanjo Station, transfer to Keihan Main Line Limited Express and go to Demachiyanagi Station. 4. Walk 8 minutes from Demachiyanagi Station to the shrine.
Train from JR Kyoto Station to Kuramaguchi Station:
1. Take the Kyoto City Subway Karasuma Line from JR Kyoto Station to Kuramaguchi Station. 2. Walk 10 minutes from Kuramaguchi Station to the shrine.
Walk from the Kyoto Imperial Palace:
The walk is just under 2kms and should take around 25 minutes. I highly recommend this, you’ll see some interesting parts of Kyoto. You can also follow this path if you want to visit the Palace after the shrine.
Walk along the Kamo River from 9hours Capsule Hotel/Kawaramachi Station/Gion area:
This is the walk I did, and it was amazing to stroll along Kyoto’s main river (Kamo River). In total the walk is about 4km and would take about an hour (more if you stop for lots of photos, like I did!). If you still want to walk along the river, but don’t want to walk as far, take the subway to Kyoto Shiyakusho-mae from JR Kyoto Station and walk from there.
Opening hours and admission cost
Opening hours:
Gates open at 6:30AM and close at 5PM.
The shrine is open everyday, and on New Years Eve from midnight into the early hours of New Years Day.
Admission cost:
Admission is free, except for the 500円 cost to enter a special prayer hall which is open from 9AM to 4PM.
Traveler’s tips
- If you’d like to get an early start on your day, visit Shimogamo-jinja first as it opens early. I was there at around 6:30AM.
- Take the time to walk the park from south to north leading to the shrine (or north to south when exiting).
- Buy a 500円 all day bus pass. Available at the bus stop in front of JR Kyoto Station and usually from your hotel’s reception. You cannot buy this pass on the bus.
- Visit both Shimogamo Shrine and Kamigamo Shrine on the same day. They are close to each other and are on the same bus route.
Other things to do in Kyoto
- Kyoto Gosho (Imperial Palace) - the closest major site to Shimogamo-jinja.
- Kinkaku-ji (World Heritage)
- Nijo-jo (World Heritage)
- Fushimi Inari Taishi (World Heritage)
- Kamigamo-jinja (World Heritage), a “sister” shrine to Shimogamo-jinja.
When to visit Shimogamo-jinja (events & festivals)
There are a large number of festivals held at the shrine every year. Here’s the pick of them:
- New Years Eve: A huge number of Japanese visit this important shrine at the stroke of midnight on New Years Eve when the shrine’s gates open. This is a very unique way to experience this occasion, and it’s easy to see how important this time is for the Japanese.
- January 1 - 3: Many festivities take place everyday for the first 3 days of the new year.
- January 4: Kemari Hajime (蹴鞠はじめ / “first ball-kicking of the year”) is a very interesting soccer/ball type game that dates back over 1000 years. Read more a bout the Kemari Hajime.
- May 3: Yabusame-shinji (流鏑馬神事 / Horseback Archery Event), an event where horseback archers dressed in traditional court noble outfits shoot at targets in the Tadasu-no-mori grove. This tradition dates back to the Heian period (over 1000 years ago). This event is a lead up to the shrine’s largest festival…
- May 15: Aoi Matsuri (葵祭 / Hollyhock Festival) sometimes also called the Kamo Festival, is one of the 3 biggest festivals in Kyoto.
- Late July: Mitarashi Matsuri (御手洗祭 / Mitarashi Festival) is a popular festival where people wash their feet in the Mitarashi Stream to be blessed by a god protecting against disaster and misfortune.
- You can find many more festivals and events at the official Shimogamo-jinja event page (in English).
Happy World Heritage site hunting in Kyoto! Only got a few more to go until I’ve seen all of them!
Kyoto by Hire Bicycle: The Definitive Day Trip Guide
Seeing Kyoto by bicycle is the best way to take in this historic city. This detailed guide will show you where to hire a bicycle and exact routes to get you around the city. See multiple World Heritage sites and explore places most tourists will miss on the bus or train.
See Kyoto by bike
In this article:
Years ago when I first traveled Japan, I spent 3 weeks backpacker style, seeing cities by train or walking. I was so jealous of the hundreds of people I saw riding the city streets.
This is the article I wish I read - to show me how to hire a bicycle in Kyoto - before I first traveled to Japan.
Since then I’ve moved to Japan and own my own bicycle. Now when I travel to other cities, I usually hire a bicycle to easily get around.
My favourite place to hire a bicycle is Kyoto. Most of the iconic tourist sites are within easy riding distance, the city is relatively flat and the layout is an easy to navigate grid pattern.
This post will show you in detail how to hire a bicycle, where to hire it from and see 3 amazing site in one day - starting at Kinkaku-ji (Golden Pavilion Temple), then Nijo-jo (Nijo Castle), Kyoto Gosho (Kyoto Imperial Palace) finishing with shopping and dinner in the city center - on a hired bicycle…
How to hire a bicycle in Kyoto
Starting at JR Kyoto train station
Front entrance of JR Kyoto station - the second largest train station in Japan and one of Japan’s largest buildings.
Get off the train, as a tourist you’ll probably be arriving by the bullet train using your Japan Rail Pass. Stash your bags in the hire lockers (they are clearly signposted and near the information desk and quite cheap to hire for the day).
Follow the signs to the north exit where you can catch a bus.
Stop 1: Kinkaku-ji (Golden Pavilion Temple)
The typical tourist shot… in HDR.
The bus stop at Kyoto station is called “Kyotoeki-mae” - literally translated to Kyoto station (eki) front (mae).
Take the bus from Kyotoeki-mae to Kinkakuji-michi (Kinkakuji road). There are signs in English, you need to get on bus number 101 or 205.
When you get on the bus, enter via the rear-most door (usually at the middle of the bus). Just inside the door is a ticket, take a ticket as you get on. When you get off at Kinkakuji-michi, put your ticket and ¥220 into the machine beside the driver.
Remember the Kinkakuji-michi bus stop, as just across the road is where you will pick up your hire bicycle (a picture of the front of the bike hire place is below, you can actually see it from this bus stop).
Aim to get to Kinkakuji at 9AM. This is when the temple grounds open. The grounds are surprisingly small, so you’ll probably only spend about 30-45 minutes inside the temple grounds.
Related article: HD video and photos from my visit to Kinkaku-ji.
Stop 2: Collect your bike from the Kyoto Cycling Tour Project - Kinkakuji Cycle Terminal
Here’s the High Class Comfort hire bicycle outside the Kinkakuji Cycling Terminal (CT).
After exiting Kinkaku-ji, walk to to the Kinkakuji Cycle Terminal and pick up your bicycle.
Book your Kyoto bicycle hire online
Make a reservation before you arrive in Kyoto. Although the hire company’s website says you must have a booking between January 5 and March 15, make a booking whenever you are going to be sure you get a bike!
Make a booking through the Kyoto Cycling Tour Project’s website. It’s all in English and you don’t need to pay online (you pay when you pick up your bicycle). From KCTP’s Types of Bicycles Available to Rent page, choose which bicycle you’d like to hire and then click on the Booking Form button.
On the form, you’ll be picking up your bike from Kinkakuji CT and return it to Kyoto Station CT.
I hired the High Class Comfort bike. I prefer the comfort bikes because the front basket is very handy (and it’s not girly! I’m a guy and this is the standard type of bike in Japan).
The bikes have a built in lock for which you’ll be given the key. Pick up a map (for ¥100 if I remember correctly) and read the simple rules about riding and parking your bike.
Stop 3: Nijo-jo (Nijo Castle)
From the hire cycle terminal to Kyoto’s castle Nijo-jo (click the link to see my visit with lots of photos) is about 4.5km and is a 30 minute ride. It’s basically all downhill and a very easy ride.
The route I’ve marked on the map takes you past a couple of shrines and temples if you’d like to see them on the way.
Near the entrance to the castle is a bicycle parking station. The parking fee is ¥200 for the day.
Take your time and look around Nijo-jo, the grounds and buildings.
Related article: my visit to Nijo Castle.
Stop 4: Kyoto Gosho (Kyoto Imperial Palace)
You can get a free English spoken tour of Kyoto Gosho (Kyoto Imperial Palace), but you must book your tour in advance. There are two ways to book the tour (be sure to have your passport/visa with you when you go to the tour):
- Book online: complete an application for visit. Follow the links and be sure to select the Kyoto Imperial Palace 60 minute English guided tour which starts at 2PM. There are a limited number of spots available to apply online, so if you miss out, you’ll have to go in person to the office next to the palace and make a booking before the tour.
- In person: visit the Imperial Household Agency Office in the northwestern corner of Kyoto Imperial Park to book your free tour. You can book anywhere from 3 months to 20 minutes in advance.
Important note: If you don’t get to book online and have to go into the office, you must book the tour in advance. I managed to ride straight from Kinkaku-ji to the Imperial Household Agency Office, book the tour, go visit Nijo Castle and then back to the Kyoto Imperial Palace for the tour.
From Nijo-castle, the route marked should take about 20 minutes. It’s probably about lunch time by now, so find something to eat at one of the many convenience stores along this route. Take your lunch and eat it in the Kyoto Imperial Park where there are lots of nice areas to sit on the grass and eat.
A general rule when parking your bicycle in Japan is not to obstruct pedestians. In the park grounds, most people park at the edge of the very wide gravel walkways, with their front tyres in the gutter. Another good rule is to park where you see lots of other bikes parked!
Related article: inside the free English tour of the Kyoto Imperial Palace.
Stop 5: Return you bike, then do some shopping or have dinner
When returning the hire bike, you’ll be bringing it back to a different location from where you picked it up. The Kyoto Station Cycling Terminal is right next to JR Kyoto station and will put you in the perfect place to do some shopping and grab some dinner.
Kyoto-gosho to Kyoto station. Note: time shown on map is for walking, you’ll go much faster by bike.
The ride back is 5km, but it’s really easy because it’s all downhill and you simply head south. It will take you 40 minutes or more depending on how slowly you go. You have to return your bike by 7PM.
Instead of taking the main roads, I suggest you take the smaller back streets. You’ll pass lots of mini-temples and shrines, unique old houses, specialty shops and any other number of surprises that you wouldn’t see if you stuck to the beaten tourist path. It’s difficult to get lost, the streets are straight and you just keep heading south. When you get close to Kyoto station there will be plenty of signs.
Once you’ve returned your bike, you can go shopping at Bic Camera, or the shopping area the other side of Kyoto Tower (the north side). Inside Kyoto station (on the upper floors, level 8 or 9 if I remember right) are some nice restaurants, I had some delicious cold soba (it was a hot and muggy summer day).
Alternate return routes
If you have time and are feeling energetic enough after your Kyoto Gosho tour, here are some alternative routes back to the Kyoto Station Cycling Terminal where you can visit another site:
Spend a day seeing Kyoto by bike
- Kyoto Gosho to Shimogamo-jinja to Kyoto Station Cycling Terminal: This is the longest route back (over an hour, not including the shrine visit) but easily the best. Shimogamo-jinja (Shimogamo-shrine) is a World Heritage site and is free to visit. After visiting the shrine, you return to Kyoto station riding along the banks of the Kamo River.
- Kyoto Gosho to Gion/Kawara-machi area to Kyoto Station Cycling Terminal: More direct than visiting Shimogamo-jinja, this route takes you to the famous Gion area. Not including time spent in Gion, this will take just under an hour to ride. From Kyoto Gosho, riding along part of the Kamo River you arrive at a bridge between Kawaramachi and Gion stations.
- Kyoto Gosho to Hongan-ji to Kyoto Station Cycling Terminal: Hongan-ji (Hongan Temple) is another one of the 17 World Heritage sites in Kyoto. This is the most direct route, which takes you just a few blocks west of the original direct route from Kyoto Gosho to the Kyoto Station Cycling Terminal.
With a whole day of bicycle rental, the possibilities are endless!
Have fun and get lost
I’m the kind of traveler who is super prepared. I created the itinerary above and followed it closely when I hired a bicycle for the first time in Kyoto. After some dinner at Kyoto station, I took a bus to Kawaramachi station and stayed at the 9hours capsule hotel Kyoto.
But some of the best times I’ve had in Kyoto are just getting lost. If you collect your bike from Kinkakuji CT at 9AM, you then have until 7PM to explore Kyoto before returning it to the Kyoto station CT. Make the most of it, use your map and take the back streets.
Enjoy, and as always, if you need any advice don’t hesitate to ask!
Traveler’s tips
Buy the Kyoto city cycling map when you collect your bike from the Cycle Terminal, for two reasons:
- It explains in English the road rules of Japan and how to use and park your bike in Kyoto. If you park your bike in the wrong spot you could end up with a fine - or worse, having the hire bicycle impounded.
- The map is of very good quality and has many back roads you can ride through to get from site to site. You’ll have a lot of fun doing this - exploring a different side of Kyoto - and won’t get lost!
Kyoto: Fushimi Inari Shrine and the 5,000 Vermilion Gates
All of Kyoto’s World Heritage Sites are unique and stunning in their own way, and the mountain complex of Fushimi Inari Shrine (AKA Fushimi Inari Taisha) is one of the most breathtaking. Thousands of vermillion coloured “torii” (a traditional Japanese gate found at shrines) line kilometers of mountain path, creating a surreal, almost tunnel-like walk to the many sub-shrines and mountain lookout.
Fushimi Inari is easy to access, only two stations from JR Kyoto station. Entry is free of charge and the shrine is open every day.
So let’s take a look around Fushimi Inari…
Photos of Fushimi Inari Shrine

Fushimi Inari Taisha’s Main Torii and Romon.
This amazing mountain shrine complex is characterised by the thousands of vermillion coloured gates that line the 4.2km main path.
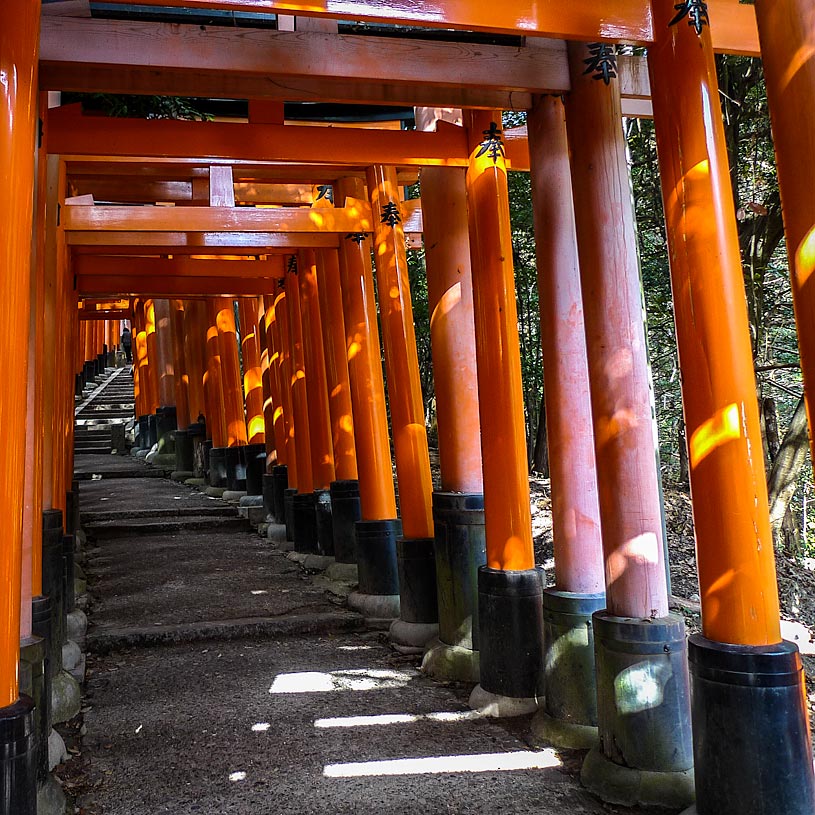
Closely packed together, some of the torii are brand new, some are falling apart.
The main suggested path is about a 2 hour walk, starting at the bottom of the mountain at the main shrine complex. We spent over 3 hours, taking our time exploring the mountain and also the shrine complex at the main entrance.

One of the entrances to the mountain path.
Smaller sub-shrines are found along the mountain path - making for a good rest stop on your hike up the mountain.

HDR photo of a sub-shrine in the mountain.
Fushimi Inari’s name comes from: Fushimi-ku, the name of the area where the shrine is located and; Inari, a Japanese deity. The Inari deity is most well know as the god of agriculture and business. As such, Fushimi Inari Shrine is frequented by businesses and businessmen praying for success. Over the new year period, millions of Japanese come to pray for happiness.
Statues of foxes are found all over the shrine. You’ll first come across them in pairs at the main gates of the shrine at the bottom of the mountain. One of the pair is holding a rice granary key in its mouth, and together the foxes stand guard and protect the shrine from evil and bad luck. Foxes have always been closely associated with the Inari god.
The Inari god and his foxes have a fascinating history, read more about the Shinto God of rice and his foxes at the Japanese Buddhist Statuary site.

The magical shape shifting fox “kitsune”.
The torii are sponsored by companies or business people. The inscriptions on the gates themselves show the business name (on the left) and the date their sponsorship started (on the right). The largest gates cost 1.3million yen - about $15,000.

The thousands of torii are paid for by business, praying for success (HDR Photo)
Individuals who wish to pray for happiness and success - but don’t have thousands of dollars to pay for a large gate to be installed on the mountain path - can buy a smaller ornamental sized gate, and have their name painted on it. They are then placed in the smaller sub-shrines and graves on the mountain.

The ritual of praying for happiness and success includes leaving your own mini-torii at the mountain shrines.

Mini-torii offerings at one of the sub-shrines on Mount Fushimi.

Looking through the torii…
As well as the smaller shrines of Fushimi Inari, a handy rest point is found on your journey up the mountain. A lookout and rest area are located here, giving you a great view of Kyoto city.

Kyoto city from a lookout on Mount Inari.
One thing you’ll notice about the torii is that some are very old and in poor condition. We happened upon this old man who was either performing some maintenance on one of the gates, or perhaps working on the installation of a new sponsored gate.

Fushimi Inari Shrine’s torii maintenance.
Maintenance must be a never ending job…

The bigger the gate, the bigger the payment = more success in business and happiness.
Located at the bottom of the mountain is the main shrine, across from Inari station. The photo below shows the lower shrine complex when coming down from the mountain.

Many large shrines and souvenir stores can be found in the main complex.
The main shrine complex contains the large main tower gate, main shrine, halls and souvenir shops.

The main hall – behind it is the go-honden (main shrine).

The main tower gate (romon). HDR Photo
One of the best free things to do in Kyoto
The ancient, UNESCO World Heritage site of Fushimi Inari Taisha is a “must-do” for anyone visiting Kyoto.
Just be sure to wear some good walking shoes - there are plenty of places to buy food and drink along the track, so don’t worry about packing supplies for a hike. Signs say the track length is 4.2km (2.6miles) which reaches the top of the mountain where a shrine is located, but if you wanted to explore all the tracks, there could be about 10km of track to explore. If you’re feeling unfit, there are much shorter routes along the path - for example, you can get to the lookout in 30 minutes and then take an alternative route back down the mountain to the main complex.
How to get to Fushimi Inari Shrine
[bgmp-map placemark=”4568″ zoom=”12″]
The easiest way to get to Fushimi Inari is by train - a bit unusual as most sites in Kyoto are accessed by bus.
From JR Kyoto train station, find the JR Nara Line Local service to Inari station. The ticket is 140 yen and it’s only a 5 minute train ride. You’ll go through only one station (Tofukuji) before arriving at Inari station.
The entrance to the shrine is literally directly across the road (to the east) from Inari station, you’ll see the familiar red torii guarded by a fox statue.
Entry is free and the shrine is always open, you can even visit at nigh-time and experience the eerily-lantern-lit paths of the mountain!
Where to stay
I’m not really the conventional traveller and don’t like to stay at hotels in Japan. But I’m a big fan of capsule hotels… You should try Kyoto’s modern designer capsule hotel 9hours near the Gion district, which is an amazing experience in itself!
Read about more things to do in Kyoto
Inside a Modern Designer Capsule Hotel: 9hours, Kyoto
In the centre of Kyoto is the most amazing capsule hotel you’ll find in Japan.
Inside 9 hours Capsule Hotel, Kyoto
In this article:
With an interior that looks like something out of Star Wars, positioned right next to the famous geisha district of Gion, this Japanese capsule hotel is a sleeping hub like no other… and it’s only 4,600円 (about AUD$50) a night.
This article is a detailed look inside 9hours - the designer/minimalist capsule hotel which opened in December 2009. Unlike most other capsule hotels, this one allows women - and out of all the capsule hotels that do allow women, this is probably the only one they would want to visit.
From a sign in the lobby of the hotel…
9hours offers a refreshing innovative service concept focusing on the “value of time” in an urban area. It attempts to break down the well known, the traditional notion of hotel service and stay. We attempt to introduce a functional accommodation experience in an unprecedented manner for those who seek practicality and special aspects in a hotel stay. You can stay here for a maximum of 17 hours. You can check in anytime.
Kyoto map, even information, Kyoto city one-day bus pass, JTB Tour applications, internet and even free lending of an umbrella!
Reception desk.
Photos of 9 Hours Capsule Hotel, Kyoto
All surfaces are sleek. All signs are part of the walls and floors. Minimal icons are used to guide you around the hotel. A simple colour scheme of white, black and silver serves to enhance the uniqueness and uncomplicated functionality of the hotel.
Lobby area (reception is behind) with elevators up ahead.
Most signs in Japanese hotels will be in English and Japanese.
Having a background in design - I'm a huge fan of Japanese design and how user friendly it always is... even without language, this image makes sense.
After checking in you’ll probably head straight to the locker and shower area. Men’s and women’s locker and shower areas are on separate floors.
There is a public bath and private shower cubicles. Just like every other Japanese capsule hotel, you’ll find razors, combs, toothbrushes and hairdryers.
The locker is a decent size, large enough to fit a small suitcase or a large backpack.
Lockers in the bath/shower area.
9hours creates an experience with their brand. All the toiletries, and even coffee and bottled water, have been made especially for the hotel.
A yukata, towel and 9hours branded toiletries in your locker.
If you’re thinking you need to choose the best time to visit Japan for a comfortable stay in a capsule hotel, you need not worry with hotels like this. Even in the coldest winter and sweatiest summer, yukatas are all you need for comfort.
You know what a toilet looks like - but have you seen a control panel for a toilet like this one?
It’s even got a button to play a flushing sound to mask whatever you’re doing in there…
A very fancy toilet indeed...
As well as the showers being on separate floors, capsule rooms for women are on different floors to the men. There are toilets and vending machines on every floor.
Men and women's capsules and bathrooms are located on separated floors accessed by separate elevators.
Another cool graphic on the walls inside the capsule hotel.
After going up the elevator and through the small, very plain room with only a vending machine and a toilet door, you enter the capsule room. There are about 20 - 25 capsules on each floor. If you’ve ever stayed at a hostel in London, you’ll know that it can be fun to hang around the 15 other people in the room - but in such a closed society like Japan, you get privacy literally by being encapsulated!
The eerie gold and green lighting illuminates the entrance to your capsule.
Locate your capsule and jump in! There is a sliding blind to give you privacy.

The entrance to your 9hour sleep system.
Inside the capsule is a very comfortable mattress, a pillow custom made for the hotel, and a control panel for lights and the alarm. Unlike other capsules, there is no TV inside - which I like, it only takes up room and distracts from relaxation.
At the foot of your capsule bed are instructions on how to use the hotel and sleep system.
You can use a normal alarm if you like, but the “Sleep Ambient System” has to be experienced. I’ll let 9hours tell you all about it - verbatim from the How to use the “Sleep Ambient System” printout inside the card left at the foot of your bed:
The “Sleep Ambient System” is designed to help you sleep better. Setup your wake up time and start the system. The lighting in the capsule dims gradually to make falling asleep easier. The next morning as your wake up time approaches, the lighting slowly becomes brighter to help you wake up comfortably.
It was a very cool way to go to sleep/wake up. When you start the sleep system, the lights slowly fade over about 15 minutes. It does the reverse to wake you up in the morning. I woke up with such a strange feeling, maybe it was my dream but I thought for a moment I was sleeping outside …
Control panel inside the capsule to set the alarm and room lights.
True to the nature of the interior, the exterior of the building is very simple.
The really convenient thing is that you can check in at anytime and start your 9hours. I first stayed at 9hours during a sweltering few days in August during my summer holiday travelling Japan. I checked in around 8PM and checked out before dawn to walk along the Kamo River.
I’d recommend staying here when you’re travelling solo or in small groups.
How to Book Accommodation at 9hours Capsule Hotel
The 9hours.jp website is bilingual and you can make a booking directly through their online reservation system. Payment is made upon arrival.
How to Get to 9hours Capsule Hotel
9hours is located in Teramachi, on the west side of the Kamo River across from Gion. There are a few train stations nearby and buses run frequently through the area. The closest station is Kawaramachi Station, here are directions to get there:
- Train from Kyoto Station: Take the Kyoto City Subway Karasuma Line for 3 minutes, getting off at Shijo Station. From there find the Hankyu Kyoto Line at Karasuma Station, heading to Kawaramachi Station which is just 2 minutes away.
- Bus from Kyoto Station: I’m a big advocate of the 500円 all-day Kyoto City Bus Pass - but when I stayed at 9hours, I took the train there and walked all the next day. If you want to take the bus, the easiest way is to ask the staff at the information center inside Kyoto station. From memory, I know the 203 bus goes along Shijo Dori - just get off at Kawaramachi Station.
Walking to 9hours Capsule Hotel from Kawaramachi Station
After getting off the train, take any of the western exits up to the street. There is a main road called Shijo Dori - you want to get yourself on the sidewalk on the south side of this road. You’ll see a MOS Burger and a McDonalds along here.
Walk west along this road, past the MOS and McDonalds. After McDonalds, turn left at the lights - you’ll be walking down a one-way street against traffic. After 100 metres you’ll see a Family Mart convenience store - 9hours is next to that!
[bgmp-map placemark=”6080″ zoom=”13″]
View this photo’s location on Google Maps.
Things to do in Kyoto
With the bus and train so close, 9hours is a great place to see the amazing and almost ancient treasure of Kyoto. Be sure to see these places on your next visit:
- The Golden Pavilion - Kinkakuji - UNESCO World Heritage Site.
- Kyoto’s Castle - Nijojo - UNESCO World Heritage Site.
- Fushimi Inari - mountain shrine with thousands of red gates - UNESCO World Heritage Site.
- Kyoto Imperial Palace - National Heritage Site.
Next time you visit the Kyoto area, spend a night at 9hours and let me know how you like it!
Traveler’s tips
- The hotel is very close - only about 2 small blocks - from Kawaramachi station. If you’ve arrived at JR Kyoto station and are visiting Kyoto and spending the day seeing the sites before checking in to 9 hours, buy a 500 yen all-day bus pass. Catch the bus from JR Kyoto station to Kawaramachi station. Leave your bags at a locker at the station.
- Toiletries are unnecessary! When staying here, shampoo, conditioner, toothbrush, toothpaste and body soap are provided
Kyoto Imperial Palace (Kyoto Gosho/京都御所): Best Free English Tour in Kyoto!
The most spacious, open and decadent site in Kyoto - and you can take an English tour of it for free…
Kyoto Gosho (京都御所) was the Imperial Palace of Japan before the capital was moved to Tokyo in 1869. The buildings have been preserved since 1877 and are contained in a walled area of the Kyoto Imperial Park (京都御苑 / Kyoto Gyoen) in the center of Kyoto.
This article won’t talk much about it’s history - you can find plenty on that topic on many other sites - instead it shows a lot of pictures from inside the palace grounds, as well as explain how to get the free English speaking tour.
Pictures of the Kyoto Imperial Palace
… and a look at the free English tour.
The tour group in front of one of the many halls, standing beside a brilliant red and white wall that leads to a huge, and very important, ceremonial hall.
In the middle of Kyoto (map at the end of this article), the Palace lies inside the Kyoto Gyoen National Garden. The entire garden (except for the Palace grounds) is freely open to the public, and it’s a nice place to bring a lunch and relax.
The garden surrounds have a rich history, during the Meiji Era it was a small town of about 200 houses for court nobles who would frequent the Palace. The remains of 9 outer gates surrounding the garden can still be seen, however most of the houses were removed and turned into the garden you can see today.
The garden itself is surrounded by a large wall, which once had 9 gates. Inside the garden, before you get to see inside the Palace grounds, you can’t help but notice the length of the inner walls that surround the Palace.
The respected 300 year old tree stands outside the wall of the Palace’s south west corner.
This is a muku tree and in the background is the wall of the Palace. The tree is highly respected in these grounds. At 300 years old, it is one of the few big and old muku trees here. It became notable after a legendary samurai, leading a radical “rever the Emperor and expel the barbarians” group, died beside the tree in 1864.
After booking in for the free tour (details at the end of this post on how to do this) and gathering in the waiting room prior to the tour, we set off (on a very hot day during Japan’s summer) for what was a 90 minute tour.
The guide, a Japanese lady, spoke excellent English. The fact that the Kyoto Imperial Palace is property of the Emperor and hence the goverment, I guess, ensures you get a quality guide!
I’ve been on plenty of other English speaking tours where the guide speaks barely legible English, sounding as if they just memorised a script - and they don’t have the ability to understand or answer any questions.
The tour shows you many different buildings and the guide explains the uses and history of these places. This waiting hall, near one of the main gates, was the first to show us the amazingly decorated interior walls. Of course, you can’t go inside these rooms but you get a great view of what’s inside.
Below is just a few (and the first) of many such paintings seen.
The style of many of the buildings - mostly the white walls - reminds me of historic Kurashiki in Okayama. The buildings here and the area in Kurashiki are preserved from the same era.
One of the great things about this place is the ability to experience it without the masses of tourists at every other site in Kyoto. There was about 40 people in our tour group, which means if you hang back or go ahead a little, you can get some great photos and really experience the expanse of this splendid Palace.
Looking at the Kenrei-mon (south most gate) I even had enough time to take a HDR photo with no-one in the shot!
Every building and area of the Palace has a specific purpose. The picture below is looking across the forecourt at the most important building in the Palace. The gravel forecourt played an important role in ceremonies - as did a few other buildings in the Palace.
Not only is this the most important ceremonial building - of which there are many - it is easily the biggest single building in the Kyoto Gosho. This ceremonial hall, and the entire area in general, was where enthorment ceremonies for past emperors took place.
The gravel garden contains a cherry blossom tree (to the right of the hall) and in view in the photo above you can see an orange tree which all played important parts in ceremony.
These walls and many other structures are well maintained. The detail is amazing. You can click the image above to see it in higher resolution and more detail. At the end of each row of roof tiles is the Emperor’s seal.
Random fact: the guide explained that most people think the red colour of the painted gates and pylons are the same as those seen in China. However Japan’s gates and temples are generally a more orange colour.
Looking at the ceremonial hall’s main gate at the beginning of the ceremonial hall’s forecourt.
Turning around from the ceremonial hall is a huge and open area. This is the south area of Palace grounds.
During this tour I learnt one of the reasons why so many amazing buildings have burnt down in Japan. Of course they were made mostly of wood, but the the roofing was made from a thatching of matchstick size pieces of wood. Crammed together these were great kindling with plenty of air space to help a fire along.
In maintaing the Kyoto Imperial Palace’s building, workers use traditional techniques when restoring the roof.
This detached building has an interesting purpose. It was built to place a sacred mirror in for the enthronement ceremony of Emperor Taisho in 1915. That’s all it does, houses a mirror, and doesn’t get much use at all.
On the east side of the Palace grounds is a man made lake and some green gardens. These are opposite some residential rooms and other types of meeting halls. They were used for recreation by the Emperor and his family.
We visited the Kyoto Gosho in the middle of summer. In autumn and spring the gardens would come to life even more, with cherry blossoms or the changing colour of the dieing leaves.
How to Book a Free Kyoto Gosho Guided English Tour
You have to book in for the tour of the Palace before you can enter, but you can do it on the same day. English guided tours take place at 10am and 2pm.
Take your passport to the Imperial Household Agency Office, which is in the west side of the garden - directly opposite the north-west corner of the Palace walls. It’s very easy to find once you get to the garden, there are plenty of maps.
The people in the office have good enough English to book you in for a tour that day. All you need to do is fill out a simple form and show them your passport.
I had enough time to go first to Kinkaku-ji (Golden Pavilion temple) in the morning, then into the office to book in the 2pm tour, then go to the nearby Nijo Castle, have lunch and return at about 1:45pm to gather for the Kyoto Gosho tour.
Annual Spring Open Days 2015
For a few days in April, the palace grounds are open to the public with no need to book in advanced. This is a great time to see the sakura in bloom in Kyoto, and get up close to some buildings which are usually closed to the public.
UPDATED:
The Kyoto Imperial Palace Spring Open Days 2016 are held April 6 - 10 from 9am - 3:30pm.
How to get to the Kyoto Imperial Palace
The Palace is in the middle of Kyoto, very close to Nijo Castle.
The best way to get there is by bus. I’m a big advocate of the all-day city bus pass (I’m about to do an entire blog post on it actually). You can get it from most hotel receptions, or from around Kyoto station. It costs 500 yen for the day - a one way trip anywhere is a flat fee of 200 yen. I usually get this pass first thing in the morning.
However on the day that I visited the Kyoto Imperial Palace I was getting around Kyoto on a bicycle. The bike hire shop was right near the Golden Pavilion (kinkaku-ji) and was a very easy downhill ride from there.
Fushimi Inari Kyoto: Japan Photo of the Month (February 2012)
I’m starting to lose count of how many times I’ve visited Kyoto. In early February a few friends and I went to Kyoto for the weekend. One of the places we went to was the amazing Fushimi Inari. I’ll be doing a detailed post about this stunning shrine site later.
For now, marvel at the main gate to the World Heritage and Ancient Kyoto Site of Fushimi Inari…

The large main gate at the bottom of Inari Mountain, leading to the torii (red gate) lined paths.
Read more and see lots of photos… Kyoto: Fushimi Inari Shrine and the 10,000 Vermillion Gates
This is a HDR photo of the main gate at the shrine area.
If you visit Kyoto, this is the number 1 place you must visit. I’ve been to Kyoto many times and visited 11 of the UNESCO World Heritage sites - this is my favourite so far!
Like what you see? Follow Japan Travel Mate to find out when the full article with lots of pictures is published (take a look at the sidebar on the right of this page, you’ve got plenty of options!).
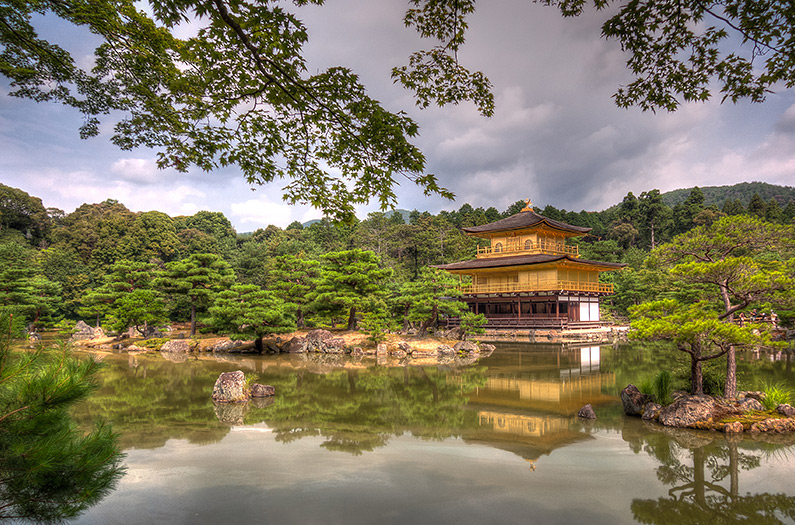
The Amazing Golden Pavilion Temple: Kinkaku-ji/金閣寺, Kyoto
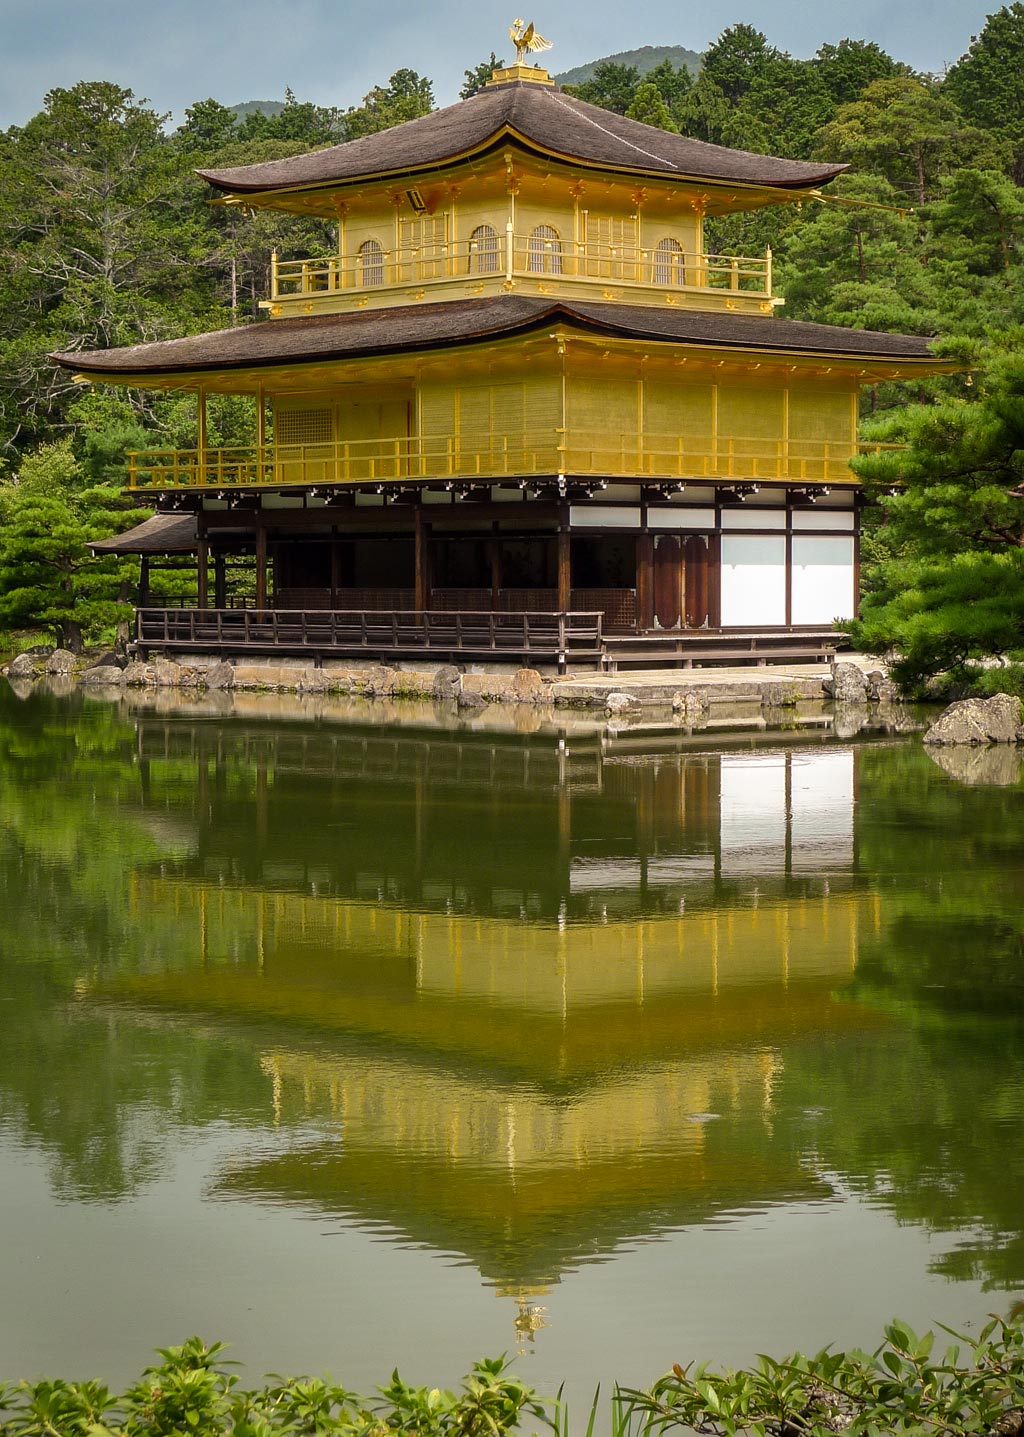
Kinkaku-ji (金閣寺): The Golden Pavilion Temple is by far the most famous landmark of Kyoto (if not all of Japan) and is the most well known of the 17 UNESCO World Heritage sites in Kyoto.
This short video was taken during my visit in summer, a long 6 week holiday free of work and teaching in Japan…
History of Kinkaku-ji
Kinkaku-ji was built in the Kamakura period (between 1185 - 1332) as an aristocrat’s country estate. In 1397 it was taken over by a retired shogun who transfored the temple into an elegant recreational villa. He had aspirations of becoming a dynastic figure, hence the gold leaf gilding.

A wide view of the temple and pond from the main photo spot (HDR photo)

Taken from the very edge of the main photo spot.
When the shogun, Yoshimitsu, died in 1422 it was converted into a Zen Buddhist Temple. After death, this shogun was awarded the name “Shari-den Kinkaku” (金 = kin/gold). That’s why today the temple is commonly refered to as Kinkaku-ji (or Golden Pavilion) and not its real name of Rokuonji Temple.
Design of the Golven Pavilion Temple
The temple has a very interesting design which is the inspiration for Ginkakuji (Silver Pavilion Temple).

The brilliance of the temple in real life just can’t be done just through photos, even HDR photos.
The first floor (ground floor) contains 2 statues and is built in the court noblemen’s residence style, reflecting an era of around 1000 years ago.

1st floor - you can just make out the statues inside.
The second floor (gilded in gold leaft) is designed in the samurai warriors house style and contains 2 statues.

2nd Floor.
The third floor (also gilded in gold leaf) is built in a Zen temple style. It also holds ashes, said to be those of Sakyamuni, the founder of Buddhism.

3rd Floor, including the Golden Phoenix on top.
On top of the temple is a golden figure of “ho-o” - a classical Chinese mythical phoenix bird.

Close-up of the golden 2nd and 3rd floors and the “ho-o” mythical bird.
The surprising thing about Kinkaku-ji, aside from the sheer brilliance of the temple itself which pictures cannot do justice, is the garden of the temple grounds.
The garden utilises the sight of a local mountain and specially selected rocks have been placed in the pond. There is also a lookout area along the path.

Anmintaku Pond in the temple grounds.

Somewhere along the strolling garden path.

Taken from the lookout area.
There are also various buildings such as halls and tea houses in the temple grounds. And of course, a souvenir shop to buy lucky charms and other standard stuff.

Hojo Building.
Visiting Kinkaku-ji
The grounds of Kinkaku-ji are relatively smalled when compared to other sites in Kyoto. Your visit would last around 45 minutes, with plenty of photo taking time and a liesurely stroll through the entire garden.
From Kyoto station it is a 15-20 minute bus ride to the entrance of the temple grounds. You’ll find signs in English at the station as well as a screen inside the bus telling you where you are and when the stop to Kinkaku-ji is coming up.
If you’re spending the day in Kyoto, be sure to grab the 500 yen all day bus pass. The buses run to all the major historical sites and areas and a one way trip usually costs 200 yen. There are vending machines for these passes at the bus stops in front of Kyoto station, if you have trouble finding them, go to the information center inside the station where the English speaking staff can help you.
Photos of Japan: My Summer Holiday
The summer of 2011 in Japan has ended. During the summer holidays I spent about 10 days travelling various parts of western Japan.
The trip took me to Okayama (west of Himeji and Osaka), then a day trip to the amazing Awa Odori festival of Tokushima and ending with a few days in Kyoto. Although I’d been Kyoto before, there really is so much to see in this beautiful city so I had to go back.
Subscribe to Japan Travel Mate posts with RSS
Shinkansen from Nagoya to Okayama
Read the post: Shinkansen: riding the bullet train in Japan - photos and HD video with all the information you need about bullet trains in Japan.
It’s been a while since I’ve ridden the bullet train. The other option to get to Okayama was an overnight bus (leaving Nagoya at about 11PM, arriving in Okayama at 7AM), and I can’t sleep on buses. So, I took the Nozomi shinkansen, it takes about 1.5 hours.
HDR photo of one of the 700 series shinkansen waiting at the station.
I’ve never ridden the Nozomi before, when I used bullet trains before in Japan it was using the JR Pass. With the JR Pass you can use almost all bullet trains, except for the Nozomi. The Nozomi is a super express, usually the newer 700 series super-cool looking train. I got to the platform very early to take some photos and videos of the shinkansen.
In Okayama I met some of my girlfriend’s family and friends. Had a fun time at an Izakaya with a cool Japanese guy who is an electronic music producer.
A day trip to Awa Odori in Takamatsu, Shikoku
Read the post: Awa Odori Festival in Tokushima, Shikoku - lots of photos and HD video from the front row of the festival’s main stage.
Next on the itinerary was a bus trip from Okayama to spend the day at Takamatsu for Awa Odori. Actually, it was only a few hours, but we saw the best of it.
The bus left Okayama station around 9AM. We stopped about everything 30 minutes at designated road-rest areas along the way. The best bit of the bus trip was travelling over the Seto Inland sea and the amazingly huge bridges.
Chanting and dancing, was truly a spectacle.
Awa Odori was just awesome. Since we were with a kind of tour, we had purchased seat tickets and had a great seat. We were in the second row of the main festival dancing stage. There are 4 such stages, as well as dancing in the streets. The dancing in the streets is free for all, so it’s hard to get such a good spot to see the dancing.
Day trip to Kurashiki
Read the post: Kurashiki and the historic Bikan district - a bit of history on a sweltering day.
Kurashiki is a unique small town on the outskirts of Okayama city. It is unique and famous for its buildings which have white walls with dark wooden frames. We spent a little over an hour roaming the streets.
A typical white walled building in Kurashiki, this one selling souvenirs.
But it was a very hot and humid day, so we didn’t last too long.
Night trip to Karakouen
Read the post: Korakuen in Okayama at Night - One of Japan’s Top 3 Most Beautiful Gardens.
A botanical/historical style garden across the river from Okayama, Karakouen holds an event each summer where for about 2 weeks, the garden is lit up at night.
A once in a year opportunity to stroll the gardens at night.
There were many awesome sights, including seeing Okayama castle lit up across the river. I utilised my long exposure photography practice from the previous nights bus trip with average results.
A few days in Kyoto
Then we headed to Kyoto for a few days. I’ve been to Kyoto at least 5 times and there is still so much I want to see.
There was a lot happening in Kyoto, as it was Obon (a festival period honouring the dead) and many families come to Kyoto for various rituals. After a ritual or two, I set off on a mission to see as many of Kyoto’s World Heritage sites that I could in just a few short days…
Kinkaku-ji
Read the post: Amazing Golden Pavilion Temple, Kinkaku-ji, Kyoto - lots of photos and a HD video.
After seeing so many photos of this place, the pure impression of seeing the Temple of the Golden Pavilion (as it is sometimes called in English) was that of pure amazement. Perhaps the most famous icon of Japan, there was a huge amount of tourists strolling through.
 in Kyoto")
HDR photo of the famous temple.
Keep an eye on japantravelmate.com, for an in-depth, photo heavy post on my visit to Kinkaku-ji, including a HD video.
Nijo-jo
Read the post: Nijo Caslte in Kyoto - as always, lots of photos and information about this World Heritage Ancient Kyoto Monument.
Nijo castle is situated in the heart of the city. However it’s not your typical castle. I was expecting to see a large building, stereotypical of a castle structure (like Himeji castle). However, Nijo-jo is more of a group of buildings, surrounded by a moat and layers of thick walls and battlements.
The main moat and high walls of the central area of Nijo-jo.
Still very impressive, and very easy to access.
Kyoto Gosho
Read the post: Kyoto Imperial Palace (Kyoto Gosho) – The Best English Tour in Kyoto for Free! - a look inside the Emperor’s previous palace - a photo heavy post!
The Kyoto Imperial Palace, and former residence of the Emperor. The palace contains several buildings, and although it isn’t a world heritage site, the grandeur of this place is very impressive.
A main hall inside the Kyoto Gosho (Kyoto Imperial Palace).
Accessible only by guided tour (tours available in English), entry is free.
Bicycle Hire in Kyoto
Read the post: Kyoto by Bicycle – The Definitive Day Trip Guide – the only guide you’ll ever need to hire a bicycle and see the sites of Kyoto.
The above all happened on day 1 of my Kyoto trip. We got around all day on some very comfortable bicycles, which were hired from near Kinkaku-ji in the morning and then dropped off near Kyoto station in the late afternoon.
Comfortable and almost new bikes, great way to get around Kyoto.
9 Hours Capsule Hotel
Read the post: Inside a Modern Designer Capsule Hotel – 9hours, Kyoto.
I’d been really keen to stay here, after seeing this place on the net a few months before. This really is a special capsule hotel, one of the newest in Kyoto. It is within walking distance to the famous Gion area of Kyoto.
A single capsule in the hotel, a specially formed mattress and pillow make for a great sleep.
Walk to Shimogamo-jinja
On the second day I got up before the sun came up, to walk north along the Kamo River towards Shimogamo Shrine is another World Heritage site, open free to the public from 6AM.
A little north of the city, near a fork in the Kamo river you'll find Shimogamo Shrine.
500 yen bus pass
After an entire day cycling, and with the temperature around 35 degrees, on day 2 I got a 500 yen bus pass. It lasts the entire day and get’s you to most of the major sites around Kyoto. A typical one way trip on the city bus is 200 yen.
Probably the cheapest way (besides walking) to get around Kyoto.
Ginkaku-ji
Everyone told me Ginkaku temple (a.k.a Temple of the Silver Pavilion) was nothing impressive at all. Being a Zen Buddhist temple, I found a quiet and welcoming serentity to the temple and its beautiful gardens.
HDR photo of the Silver Pavilion Temple.
Daigo-ji
I was looking for outstanding things in Kyoto, and at Daigo-ji you can stand beside the five-storey pagoda (gojunoto in Japanese), which is Kyoto’s oldest wooden structure that is still in existence today.
The five-storeys of the main pagoda temple in Daigo-ji.
There are many grand temples, modest shrines and beautiful gardens throughout the Daigo-ji temple area.
Kyoto station
Continuing to look for outstanding things, I spent some time in Kyoto station. While hanging around a train station doesn’t really sound like fun to most people, you have to realise that Kyoto station is the biggest train station in Japan.
There is a happy place on the top of Kyoto station.
If you ever visit, be sure to take the many escalators to the Sky Garden where you can look out over Kyoto.
Stained glass windows
Spotted just a few blocks north of Kyoto station, is Yodobashi department store. It must be very new (on Google Maps street view it looks to be under construction). Along the south and west facing streets are these great colourful stained glass windows depicting various scenes from Kyoto.
There was at least 10 of these above various windows and entrances to Kyoto-Yodobashi department store.
…watch this space for photos, videos and more in upcoming posts.
Kyoto: Things To Do
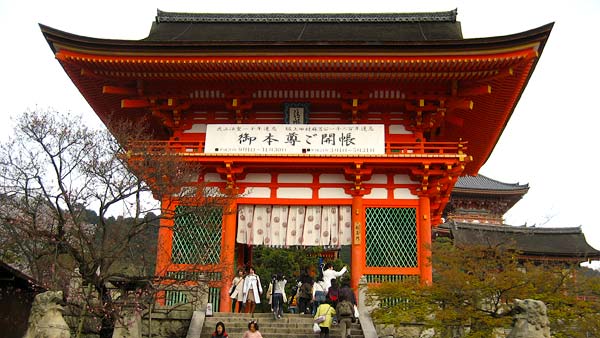
Kyoto, Japan is the pinnacle of Japanese culture. A holiday to Japan is not complete without a visit to Kyoto, and the famous Kyoto temples, castles and shrines. This article will explain how to get to Kyoto, and what to see when you get there.
Getting to Kyoto
The best way to get to Kyoto from other cities is by the bullet train (shinkansen). You can use a Japan Rail Pass (JR Pass) to take the bullet train to Kyoto Station. If you don’t have a JR pass you can still buy shinkansen tickets to Kyoto from JR stations which the shinkansen passes through.

Kyoto Station is one of Japan’s largest buildings, and is the second largest train station building in Japan.
Kyoto train station is a mega-hub as far as stations go, and is a tourist attraction itself. It services two JR lines and some private lines. It is quite a sight, very large inside and looks to be a very new building with lots of shopping, cinemas, hotels and more. Kyoto station is easily accessible from the other major cities such as Tokyo, Osaka, Okayama and more.

Just one of the statues outside Kyoto station.
A quick travellers tip for this station, my friend had a very funny experience, when he encountered a toilet inside the station that did not have toilet paper. It is extremely rare, but some places require you to purchase toilet paper. My advice… if people are handing out tissues on the street (which they do everywhere, popular method of advertising), then do take a few and keep them in your carry bag.
Getting to the main tourist attractions in Kyoto
Kyoto is a city that requires a bit more exploration, but it is well worth it. Unlike other cities where you step off the train and you are amongst it all, you generally have to take a bus to get to Kyoto’s temples, castles and shrines. There is a major bus terminal adjacent to the station with plenty of information in English.
As Kyoto is such a popular place for Japan tourism, you can find tours and tourist information in English to help you find the right buses. Take a look outside the station to find these.
A Kyoto temple you must visit
You will not find any photos of the interior of Sanjuusangendou (translated literally into 33 ken/length hall) here, as the monks forbid it. However, inside this building is one of the most amazing sights you will see perhaps not only in Kyoto, but all of Japan…

Sanjuusangendou view from the temple gardens.
The main hall contains a marvel, the Thousand Armed Kannon Statues. This temple is a National Treasure, and it is easy to see why. The hall contains 1000 life-size statues, all coated in gold (the remnants of the original coat anyway), all striking different poses. Some are from the original temple and some were rebuilt in the 13th century.

Sanjuusangendou verandah, used over hundreds of years for traditional archery competitions and displays.
The outside of the hall contains the temple gardens, strewn with shrines, ponds and more. Since the Edo period, the verandah outside the hall has been used for famous and traditional archery competitions, and marks can still be seen underneath the roof of the walkway.

One of the ponds in the gardens surrounding Sanjuusangendou temple.
Kiyomizu Temple
This temple in Kyoto is easily one of the biggest temples I have ever been to. It is positioned on the mountain overlooking Kyoto, and is extremely popular, especially in the Japanese spring.

Kiyomizu Temple, viewed from one of the shrines.

A view of Kyoto city from Kiyomizu temple.
Around the temple are many large and small shrines. A popular activity at a Shinto shrine is to drink natural spring water, it is a form of prayer (but I just make a wish!). You can just watch and learn, but the basic method (I’m told…) is to first wash your hands (with the water in the rock basin) take the ladle, which is on a long handle, fill it with water which is dripping down from the small rock canal. You then pour a small amount into your hand and drink it.

After hands are washed, drink from the ladle.
Things to do and places to visit in Kyoto
UPDATE: May 23, 2013
Since first publishing this article I have traveled Kyoto a lot! Here are some more things to do and see in Kyoto, see more articles for in-depth information:
- Hire a bicycle in Kyoto - and see the city like a local!
- Stroll through Fushimi Inari Taishi - the World Heritage mountain shrine with 4km+ of red/orange torii lined trails. Free to visit and just 2 stops from Kyoto station.
- Visit the Kyoto Imperial Palace - This is a stunning site, a look inside the emperor’s palace when Kyoto was Japan’s capital. Daily free English guided tours are available (see the article for all the details you need to book a tour).
- Visit Nijo Castle - located in the center of Kyoto, not far from the Imperial Palace is a unique flatland castle.
- Gaze in awe at the Golden Pavilion Temple - Kinkakuji is one of the most famous icons of Kyoto, get up close and see this World Heritage site.
- Stay at the 9hours capsule hotel - located near Gion and the Kamo River, this is a uniquely modern Japanese accommodation experience!
- Stroll through Shimogamo Shrine - just north of Gion/9hours Capsule Hotel along the Kawa River, this is an ancient World Heritage site that most tourists don’t get a chance to see.
The pinnacle of Japanese culture
Kyoto has it all when it comes to Japanese culture. It is also a great place for authentic Japanese food and drink, as well as purchasing unique, hand-made souvenirs.
This article is basically a travelogue of a day trip which my friends and I did in Kyoto. We arrived by around 9AM, and between seeing the sights, had time for a nice lunch and souvenir shopping before getting on the bullet train to Okayama.
Other famous places in Kyoto that you should (and that I want to) visit are: Kinkaku-ji (Temple of the Golden Pavilion); Saihō-ji (Temple with famous moss garden); Nijō Castle (with fortifications, a palace, older palace ruins and gardens); and many more…
© 2016. All Rights Reserved. Created by ZERGE for themeforest.net